Tuesday, September 2, 2014

Kefka Palazzo

Last year for my first DragonCon I went as my favourite character from my favourite video game; Yuffie from Final Fantasy VII.  It was my first major costume construction and I had such a wonderful time making it.  For my second trip to DragonCon I wanted to do another of my favourite video game characters.  I chose arguably the greatest villain in video game history, Kefka Palazzo from Final Fantasy VI.

Final Fantasy VI was a 16-bit video game released for the SNES, as such the characters were not as visually well formed in-game as they were in the later Final Fantasy games, and were instead represented as sprites.  Fortunately there exist some beautiful concept drawings by Yoshitaka Amano, and I used the most popular of these as the inspiration for my own Kefka costume design, with a few artistic liberties taken.
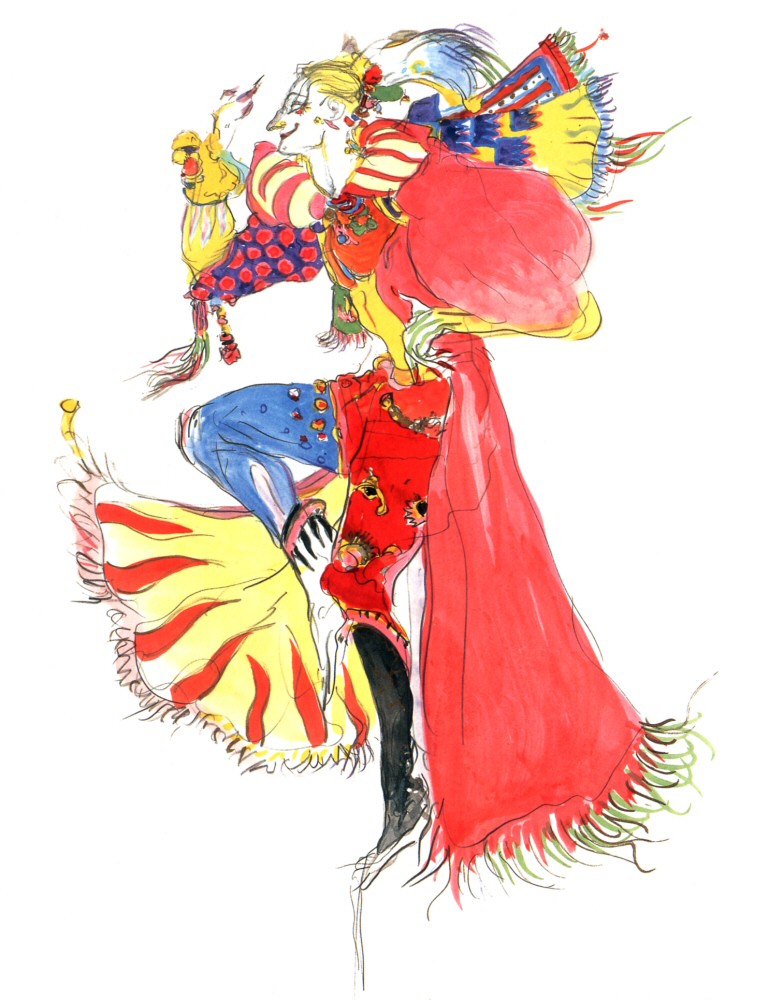

Kefka is a court mage, with an outfit similar to a jester.  The concept artwork reminded me of somebody who had fallen into a collection of silk scarves.  I chose synthetic silks for most of my fabrics, other than the main bodice and the pants, because much to my dismay I'm not made of money.  For the main bodice and pants I chose a thicker material with a satiny finish, and some black detailing of an east asian style.

Part I - Top

I stuck fairly close to the artwork for my construction of the top, which I interpreted as a fitted yellow bodice (I used a pre-made yellow satiny corset for this, as I did not feel like constructing my own) with a puffed red fabric over the chest, large puffy upper sleeves, and yellow draping lower sleeves.

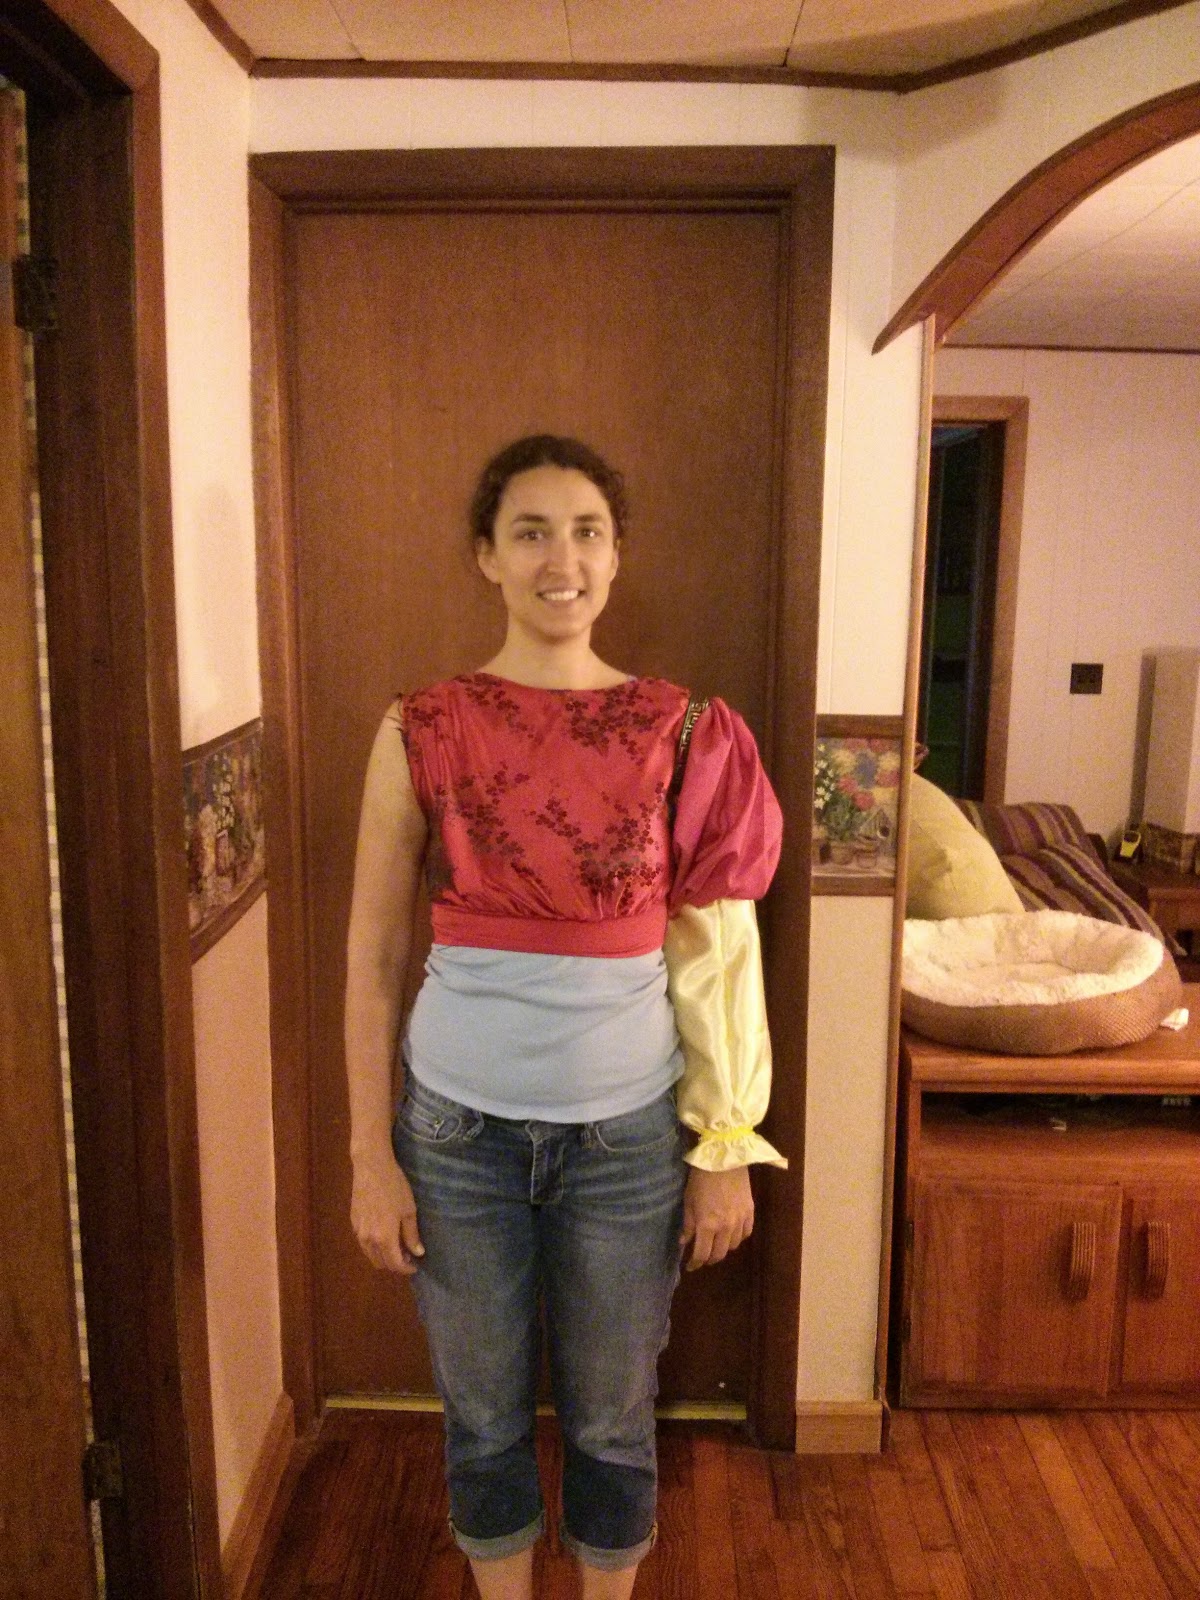
I made a fairly basic red blouse simply by laying a loose fitting blouse I owned already over my fabric, and then cutting it to a crop top.  I gathered the fabric along the bottom of the blouse and added a spandex waist band.  I felt this style would hold the blouse in place under the bodice, without too much bunching.


To make the sleeves I again laid out a blouse that I owned onto some tracing paper and traced out the line of the sleeve from the shoulder to the elbow.  As I wanted to have large puffy sleeves though I needed lots of extra material on my sleeves in order to gather it at the ends.  I cut the pattern into strips and laid it out on my cloth, leaving generous spacing between the strips.  I ended up making the sleeve about 2.5-3 times wider than the pattern because the silky fabric turned out to gather very well.  I added more width in the middle of the sleeve, which would end up on the top of my shoulder, than at the ends, which would end up under my arms, as I wanted more "poof" on my shoulder. I interpolated between the pattern strips and cut out the sleeve piece.  I gathered the fabric along the curved edge of the sleeve, leaving about an inch on either end, so that it would not be gathered under my armpit.  I gathered the fabric by running it through my sewing machine on the longest stitch and highest tension, and additionally held the thread spool to increase the tension further. Once the sleeve is gathered it creates a nice big poof.


I sewed the edges together to form the sleeve, and then gathered the bottom of the sleeve as well.  I attached it to the shoulder of my blouse and sewed a piece of gold and black trim around the shoulder seam.  I sewed a yellow frilly elastic , slightly smaller than the circumference of my elbow, at the end of the sleeve, to hold it up slightly on my arm and enhance the "poof".
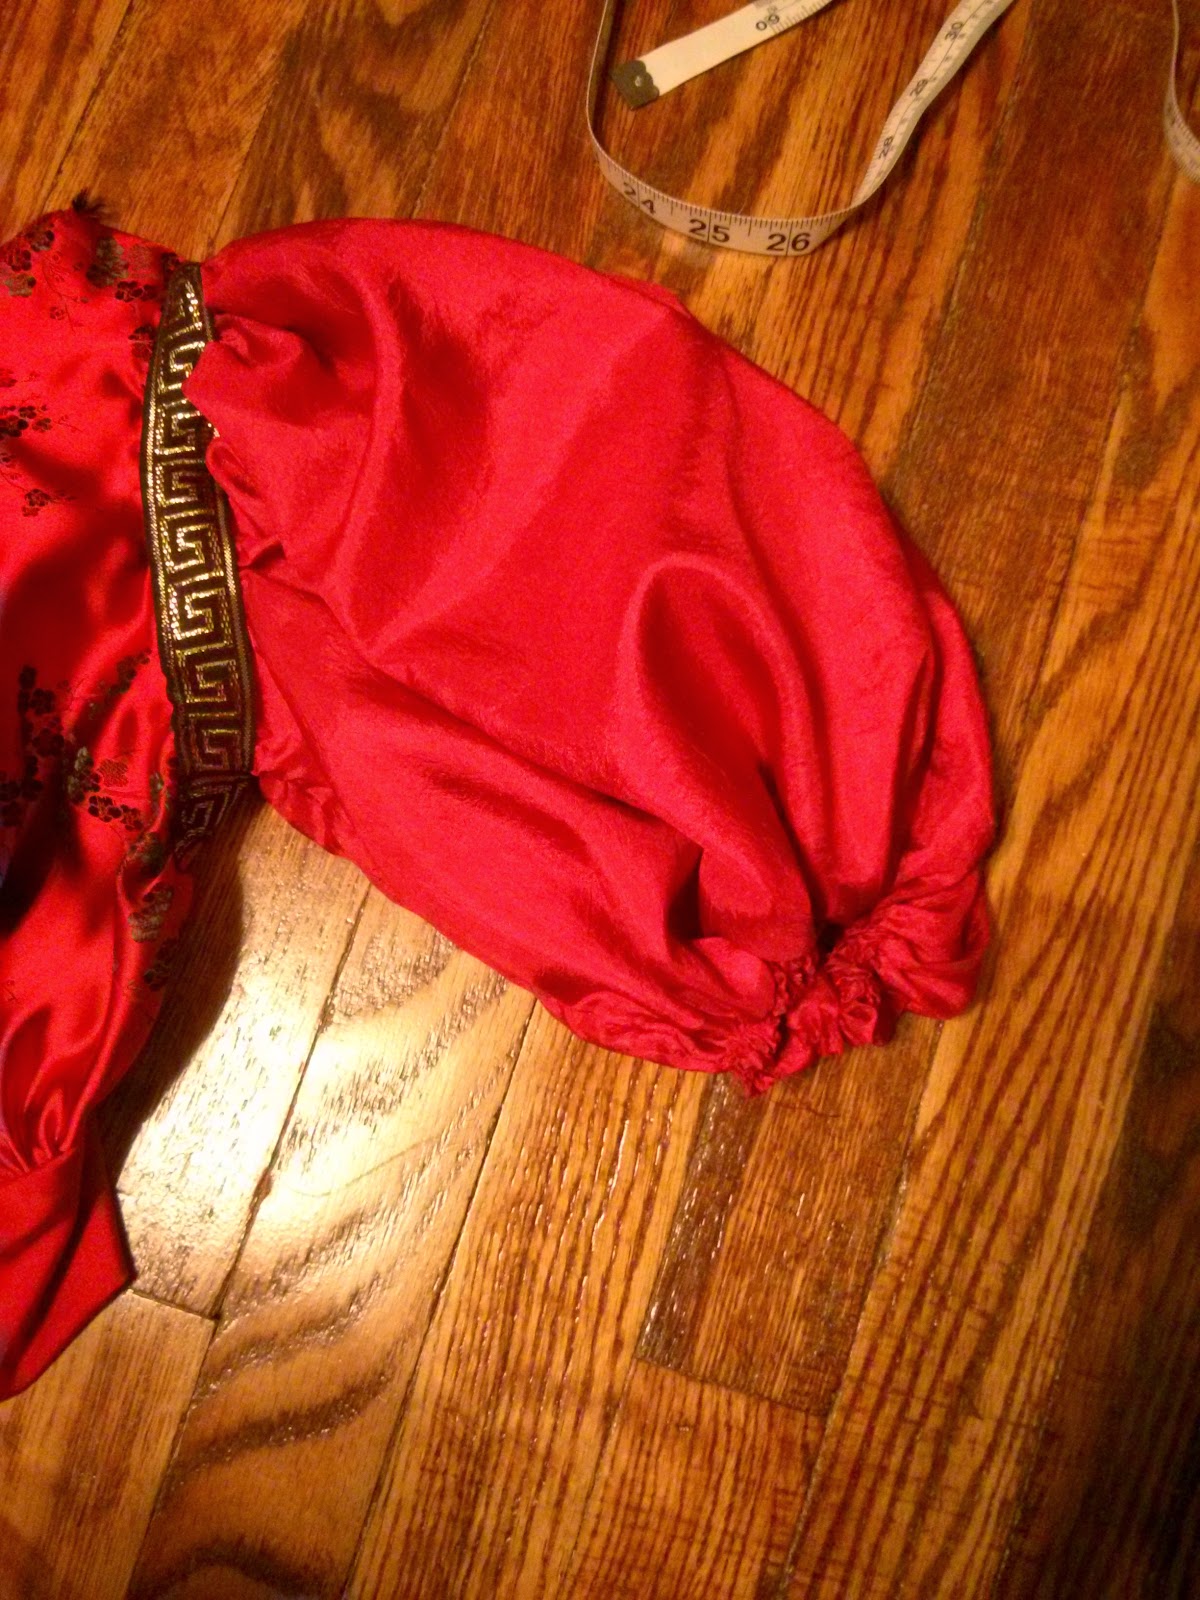


I sewed a basic tube for the lower sleeve that was about 25% larger in circumference than a typical sleeve, at the elbow, providing a small amount of gather, and about 50% larger than a typical sleeve at the wrist.  I attached the lower sleeve to the upper sleeve, which I didn't do quite right, and ended up covering up most of the frilly yellow elastic, which I had meant to leave exposed.  I gathered the fabric at the wrist, and attached another piece of frilly yellow elastic, leaving about 2" of additional length, and double hemmed the end.


Displaying the finished first sleeve and blouse, I wanted to check and make sure everything puffed well and none of the joints were too tight, restricting movement. 


I made the second sleeve in an identical matter, except that I had to make polka-dotted fabric for the upper sleeve first, as I couldn't find anything appropriate at JoAnn's.  I used red felt for the polka-dots, as I didn't feel like hemming and sewing on a few dozen circles.  The felt didn't need hemming and could be fairly easily glued.


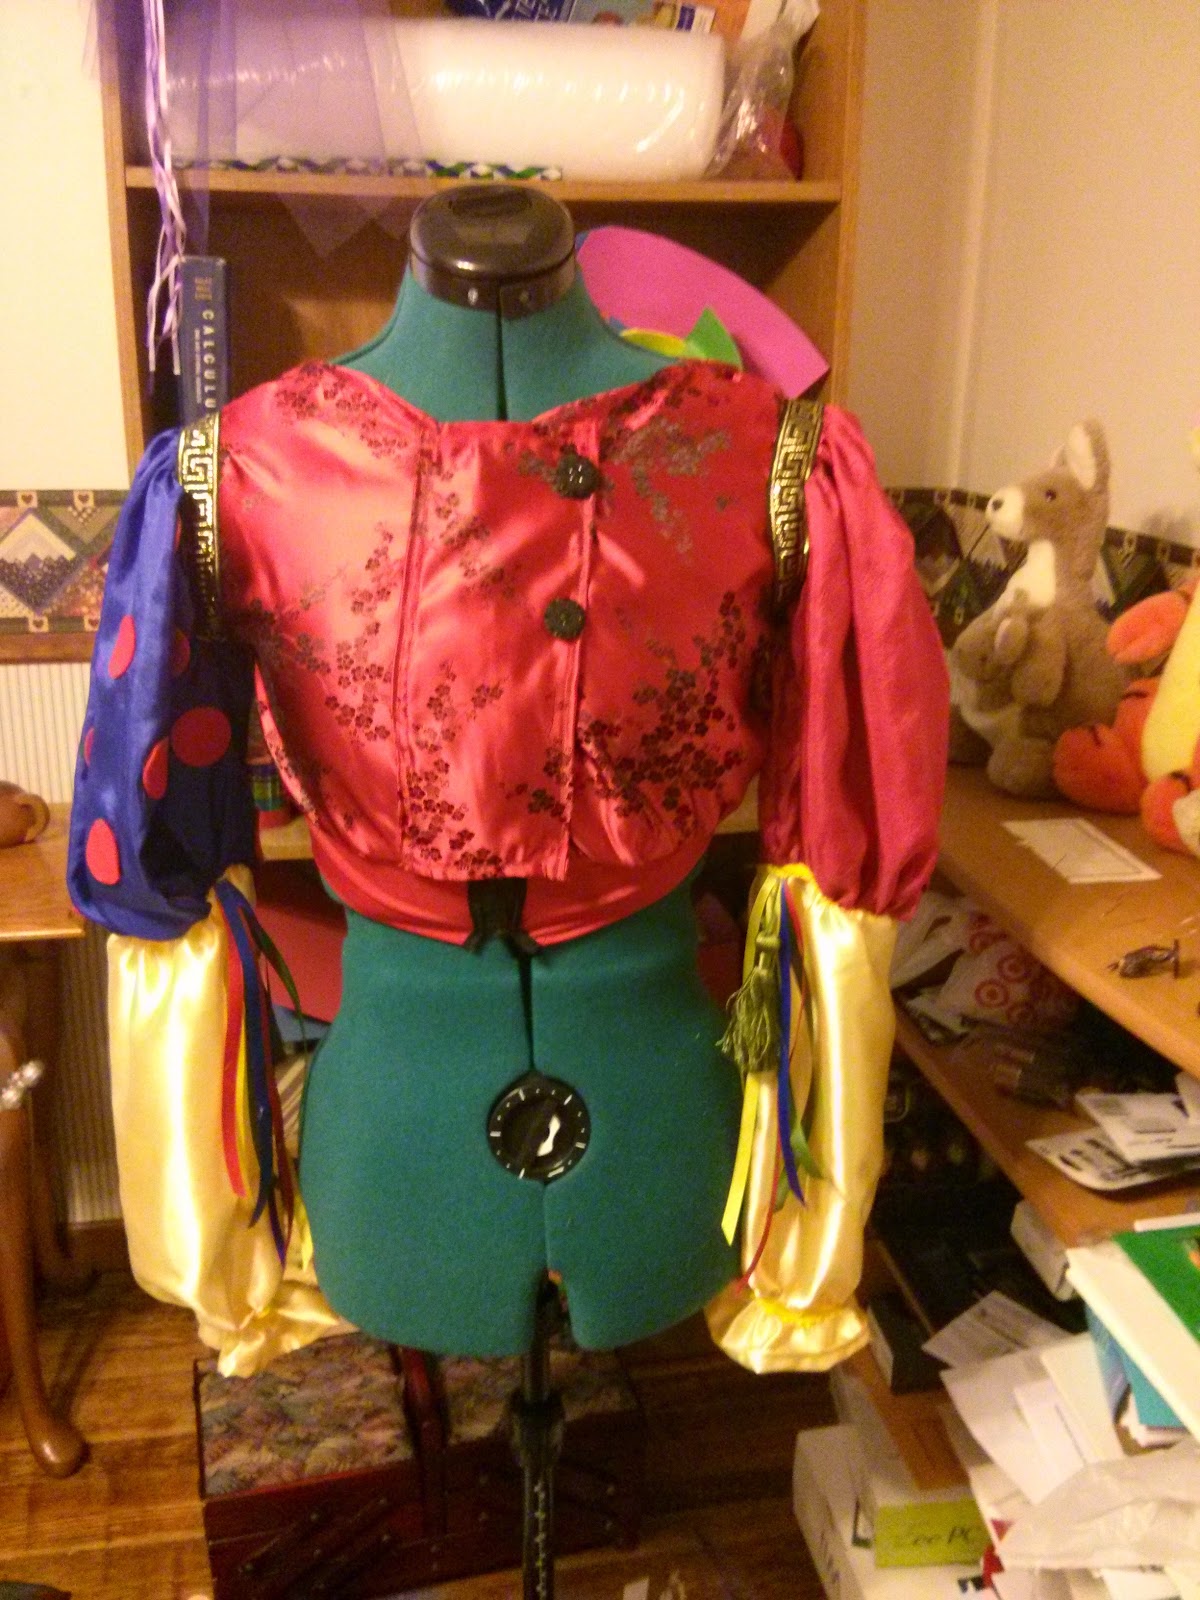
When I put everything together I found that the top was a bit difficult to get on and off.  I decided to split the entire thing up the front and add a zipper.  Then I added a panel to cover the zipper, and snaps to keep it closed. I added some ribbons and tassels to the elbows, and some buttons along the front to finish it off.

Part 2 - Pants

I made the pants very similarly to how I made my Uber Pants.  In fact these pants were the inspiration for the uber pants.  I won't go through all the details of construction, as you can see it in the uber pants post.  I cut out a basic straight legged pant based on a pair of jogging pants I had already, then gathered the waist and cuffs and added spandex bands.  I did a bit of extra fitting around the hips and backside afterwards.  I purchased some basic blue legging off eBay and added some detailing with fabric paints and some craft jewels.  After trying them on with the pants I decided they were a bit too warm, so I just cut out the leg that was visible and sewed it to the red pants.  I added some detailing with white fabric paint and small gems.


Part 3 - Cape and collar

The cape and collar were actually quite simple, and I'm really happy with how they turned out.  Kefka's cape appeared to be split in the back, or two separate capes, so this is the approach that I took.  I cut two sections of my cape material each about the length of my shoulders to my ankles, and as wide as the bolt.  I ended up having to trim my yellow material to a smaller width, as it was wider than the red fabric.  I placed the red and yellow fabrics together, with good side in, and attached sewed up the sides.  Next I turned them right-side out to add the red triangle "flames" on the bottom of the cape.  I had intended to use cut out triangles, and actually went ahead and made about a dozen of these, before deciding that fabric paint would actually look better, and have a more "hand-drawn" look, like in the concept art.  Here's the triangles I ditched, and what the painted triangles ended up looking like.


Next I took my fringe and sewed it to the bottom of the cape, on the outside of the yellow side, with the fringe pointing up.  I turned the cape inside out and sewed together the bottom edges, then turned it back right-side out, which left the fringe would hand down from inside the hem.   As the top of the cape would be underneath the collar, it didn't need to have a nice hem, so I sewed the tops together once the cape was already turned rightside out (normally I would have to slip-stitch this to keep the raw edges on the inside).  Then I gathered the tops of each cape section into only about a 6-8" of width.


For the collar I measured the approximate width of my shoulders, added an inch, and then cut a square of the red material with this length on each side.  I folded this square in half, then in half again, to make a square 1/4 the size, and then folded it in half across the diagonal to make a triangle.  I cut an arc along the bottom of the triangle keeping the same radius along the length of the arc.  Then I cut another arc along the top of the triangle, with a radius of 2.5".  I unfolded it into a nicely cut circle, and split it to make the collar opening.


The red material forms the bottom of the collar, but the upper part of the collar is multi-coloured, so I had to cut multiple sections of red and yellow fabric and attach them to each other.  Time for my favourite part of the costume making process, the math!!

I decided on 8 sections to my upper collar, which would mean each section would have an angle of 45 degrees (360 / 8 = 45!)  I calculated what the length of the cord and the arc would be for each section, and drew a to scale section.  I then drew on and cut out the upper arc as well, keeping a radius of 2.5" from the tip of the section.  I used this to cut out 4 pieces of each colour, leaving an extra 1/2" on each side to attach the pieces together.

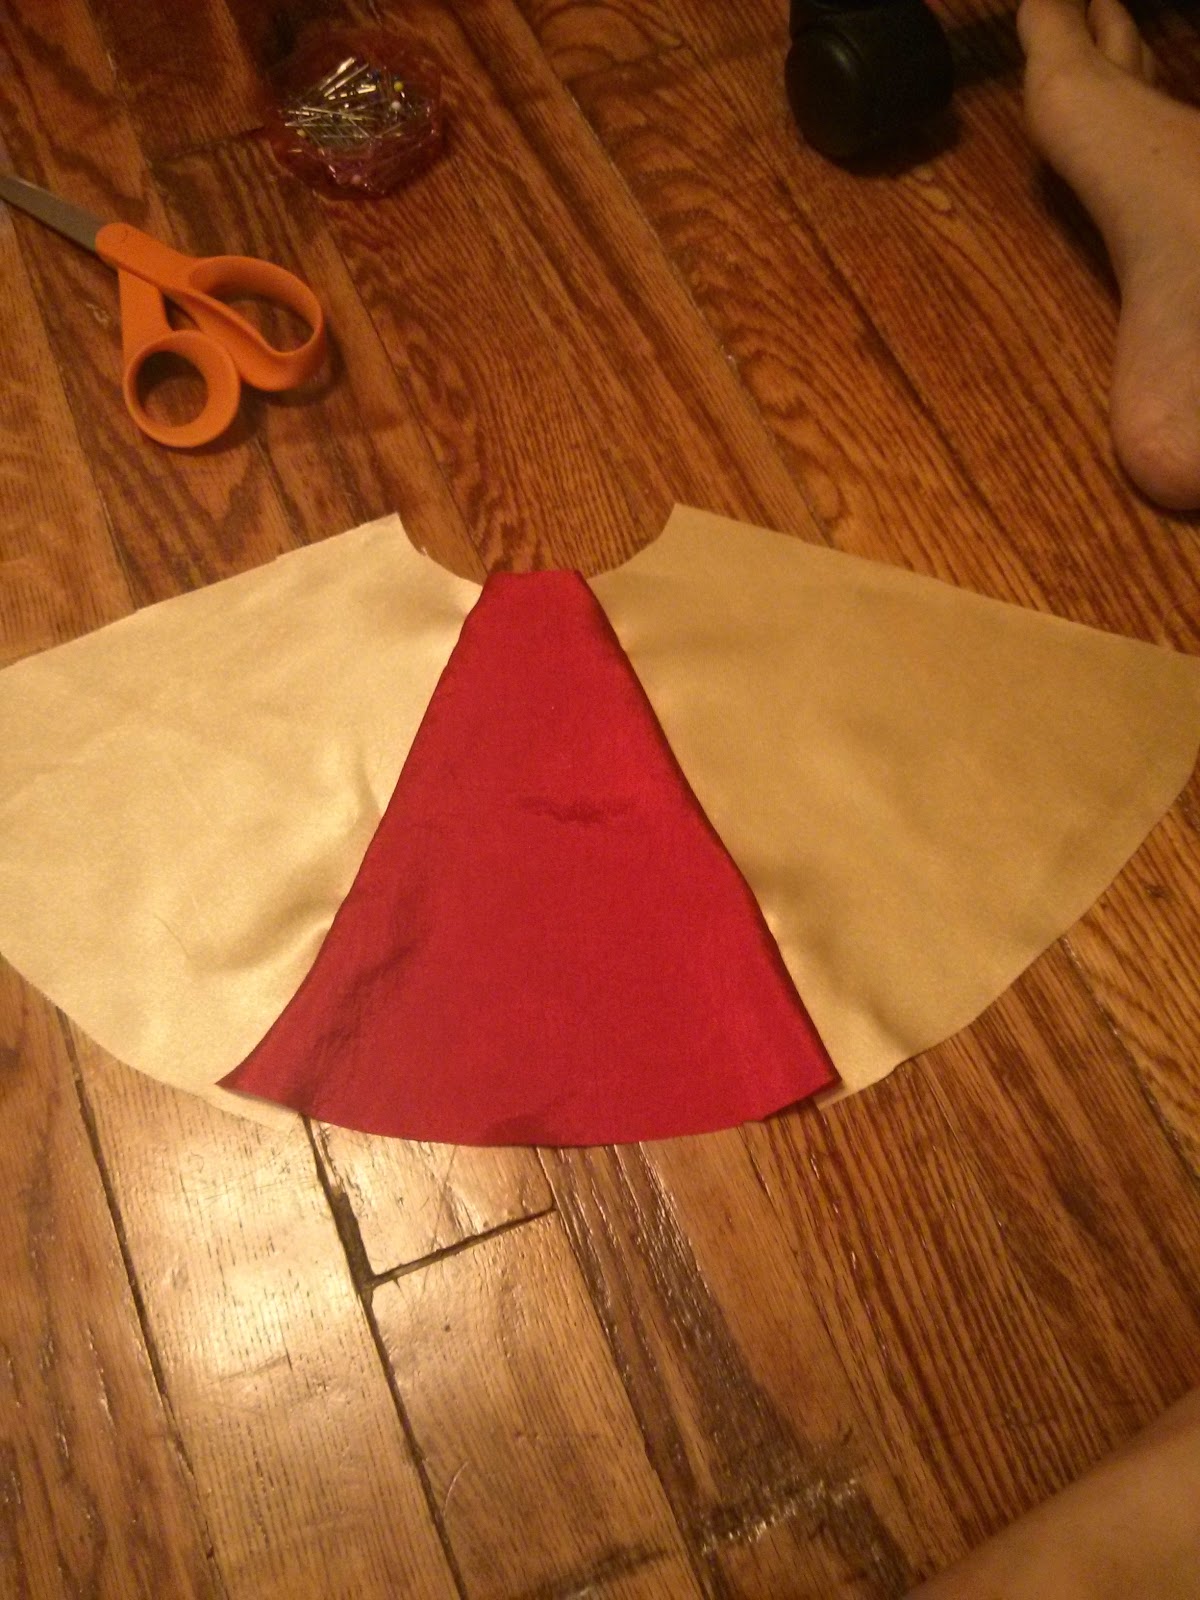
I started attaching the pieces together one by one, laying the fabric down on top of the red circle after every new piece to make sure I was on track.  When I had completed the full circle I attached a piece of red piped bias tape to the outside, with the piping on the inside (again, like the fringe, this would be so that when the raw edges were sewn together and the collar was turned right-side out, the piping would be on the outside. I also attached this piping to the edges of the collar.


Next I pinned the upper and lower pieces of the collar together with the good sides together.  The top piece ended up being a bit smaller than the bottom piece, but I just trimmed up the bottom.  As long as the inside edges matched fairly well the outside edges could be re-trimmed. ,I sewed together both the outside circumference and the edges, but not the inside circumference, then turned the collar right-side out.

I filled the collar with stuffing (available at any crafts store) and then sewed up the inside edge by hand.  I didn't bother slip stitching this seam either (done to keep the raw edges on the inside) and instead I covered it in bias tape, which I also hand stitched.


I took the two pieces of the cape and attached it to the collar.  I had each section of the cape take up about two inner circles worth of width, with a small overlap in the center.  I stitched these on by hand, and then went over them with a zig-zag stitch on my sewing machine for extra strength.


I sewed on a strap that would go over my shoulders and under my back, underneath my shirt, to support the weight of the cape, so that it wasn't pulling on my neck.  Finally I made some scarves out of scraps of silk, painted them with fabric paint to look like the ones in the source artwork, and attached them to the cape sticking out to the side.


Part 4 - Boots and Wig


I bought a pair of slouchy faux-leather boots from Amazon for $20.  I got them in white, and then painted one boot black using fabric paint, thus saving me from having to buy two pairs of boots.  I painted the black triangles onto the white boot, and added an upper red edge with bias tape.

The wig I also got on Amazon, for $10.  I order a light blonde wig, but they sent me the regular blonde one instead, so it wasn't quite the right colour, but it took about 3 weeks to get here from China and I didn't have time to order a new one.  I trimmed the wig, tied it into a ponytail, styled the bangs back, and added some feathers and tassels onto it (pro-tip, don't glue things onto a wig while wearing it if you don't want to be picking glue out of your hair for the next week...)


Final Results


Ta-Da!  I was pretty happy with how this turned out.  I may upload a few more photos, as there's details you can't quite see from this one picture.  I used Mehron clown white grease face paint, and then some cheap red halloween face paint for the eyes.  I also threw in some white lace gloves, as I didn't want to paint my hands.  Here's a picture of me fighting Sephiroth for good measure.


Sunday, June 29, 2014

Shae

Ryan had mentioned a few times over the last week or two that there was a party on Saturday night that we should at the very least stop by if our schedules would allow, as there were some people there he wanted me to meet.  I said sure but then didn't think much more of it.

At dinner on Friday night I finally decided to inquire about when/where the party was being held.  He told me, and then added, oh ya, and it's a Toga/Game of Thrones themed party and everybody will be in costume...He told me this less than 24 hours before the party.  He seemed to think that I would be OK going to a costume party, themed along one of my favourite book series', and NOT wear a costume.  He does not know me as well as I thought.

So, on the way home form dinner around 9pm I start wondering what I can put together cheaply and quickly.  Shea was the first thing that came to mind, as we have a similar hair style and her dress is not very fitted.  It's a halter style backless sack dress with a belt and a sort of mini cape-like scarf thingy down the back.


JoAnn's is usually my fabric shop of choice, but they were closed by the time I headed home on Friday night, so I headed to the only place that was open, Wal-Mart.  Not my favourite place to shop, but I was on a deadline, and as I was playing tennis in the morning, I wanted to get at least half way done tonight.  I grabbed 4 yards of a surprisingly cheap satin-like pink fabric, half a yard of a flowery pink fabric that was slightly stretchy, a spool of pink thread, a roll of a cream ribbon and a yard of a cream and gold cord.  All for about $20.  Not bad.

I laid out the fabric, still folded in half, and cut it to the length I wanted, the length from my collar bone to my ankles.  I then cut it (still folded remember) into a sort of trapezoidal shape, with a bodice about 24" wide (12" folded) and 12" deep, and then cutting on an angle of about 45 degrees out to the edge.  I made two pieces of this shape.


Next I sewed the two pieces together along the sides, all the way along the straight edge on the bottom, the angled edge, and then about half way up the straight edge of the bodice.  This will  become the sort of "armpits" of the dress.  On the section of fabric which would become the back of the dress I cut a scoop back between the two armpits, scooping down about 6".  I then tried on the dress, holding the "armpits" in place, and pinning the back approximately where I would want it at the small of my back.  I cut out a bit more scoop, and then pulled the fabric in a bit as it was too loose.  I hemmed all the open edges at this point, other than the bottom.  Here's what the back looked like after the first scoop cut.  I ended up making this a bit more triangular and pulling the fabric in a bit.


Next I folded over the top edge of the front of the dress to make a channel for the cord.  Then I gathered this channel (see my "Uber pants" post for a description of how I gather fabric), threaded the cord through, and hot glued the ends of the cord into the channel so that it wouldn't slide around.  On this photo you can also see how I opened the back up a bit more and also pulled the fabric in a bit to make the back less loose.


No photos of how I added the ribbon along the front, but I just cut two pieces as long as the length of the dress and hot glued them to the front.  It's not rocket science people.

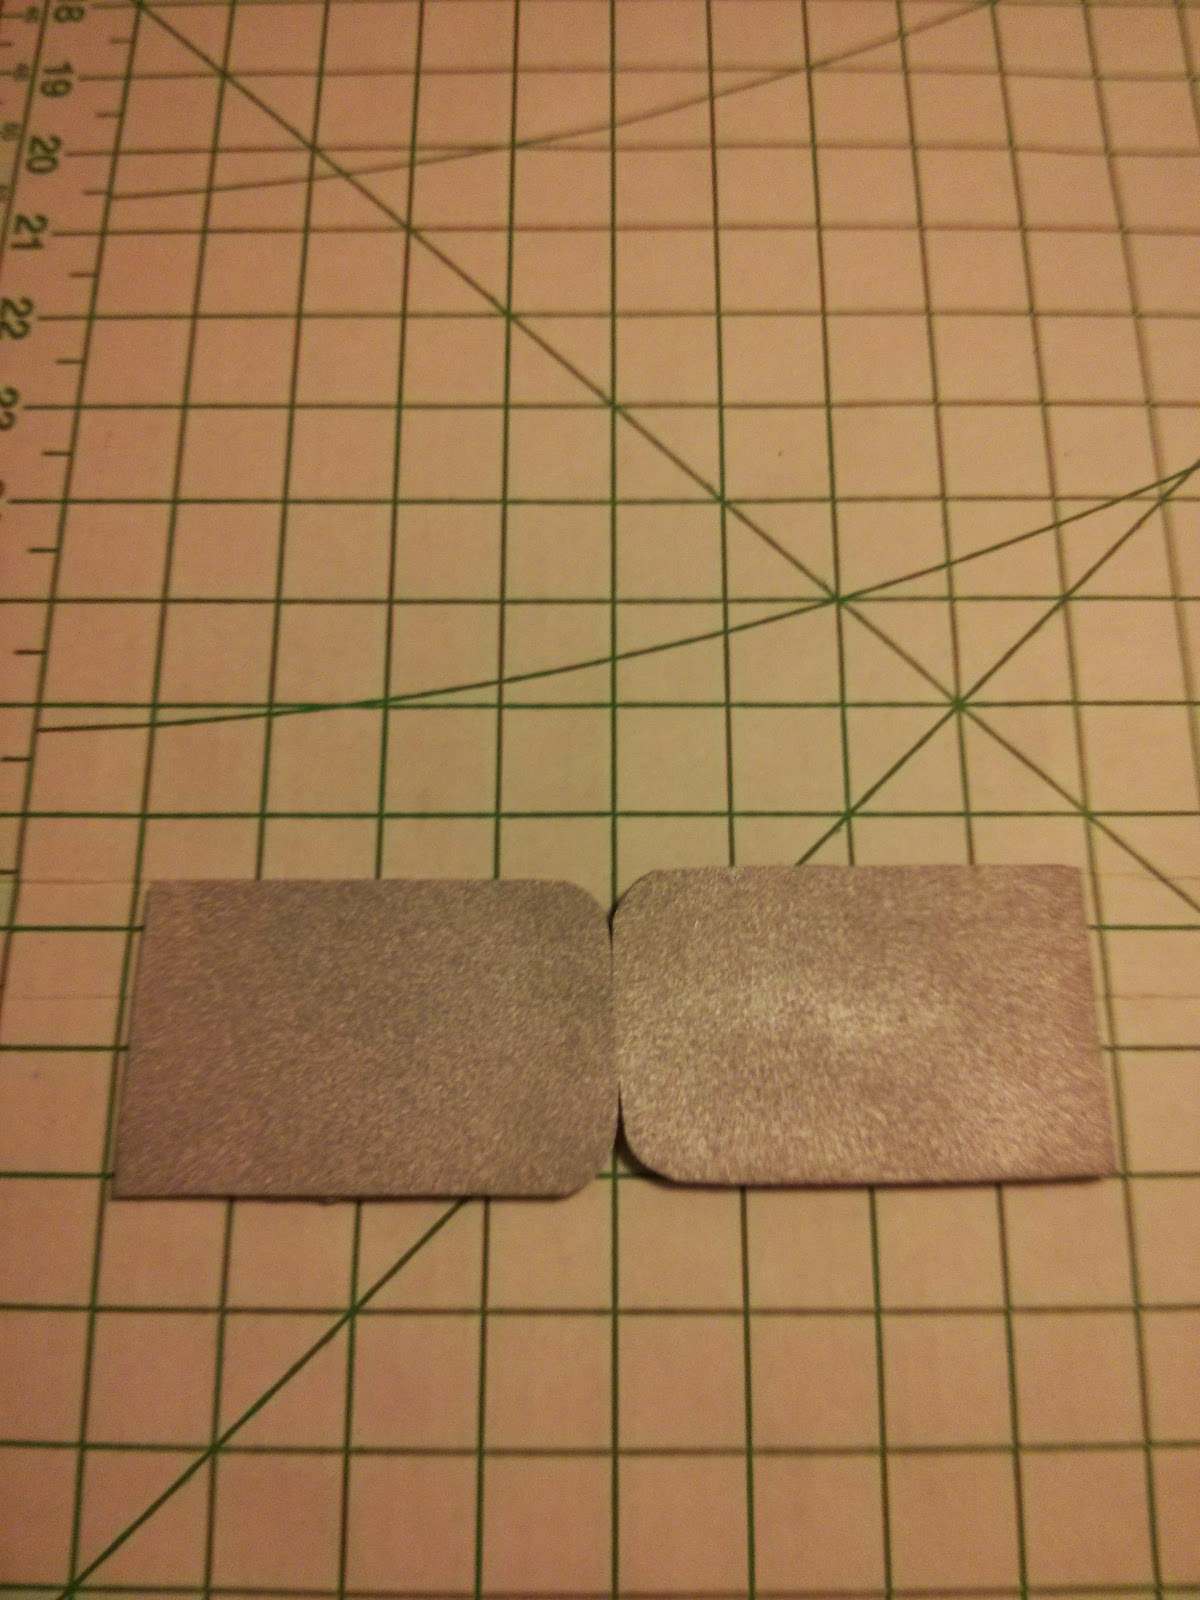
Along the way I started making the belt.  I didn't want to blow $20 on a nice belt clasp for this costume, so I made one out of craft foam.  I cut two pieces of cheap craft foam in the shape of the two belt clasps, and also a piece that would be as large as the two pieces end to end.  I used a spray adhesive to glue the two buckle pieces onto the larger piece, and trimmed away the excess so you couldn't see the backer piece underneath the buckles.  I used my hardcover copy of A Dance With Dragons to press them down, which I thought was appropriate.  After about 10 minutes under the book I spray painted it silver.


To make the belt I cut a rectangle a little bit longer than the circumference of my waist and twice as wide as I wanted, then doubled it over with the good side on the inside, sewed the edges together, turned it right side out, and then hemmed the edges.  I attached pieces of velcro to either end.  Then I used hot glue to attach the belt buckle to the front of the belt.  I used some black and silver paints and some sequence I had sitting around to add a bit of detailing to the buckle.


Finally I made the cape/scarf/train thingy that hangs down the back.  It's basically just a rectangle as long as the length from my shoulders to my ankles, and about a foot wide.  I hemmed all the edges and then made a little loop at the top so that I could attach it to my halter.

Speaking of the halter, I worried about it coming undone if I just tied it at the neck, so I tied two bowline knots in each end, leaving a small loop, and then used a small carabiner to hold the two loops, as well as the loop holding my cape/train/scarf.

Here's a photo showing how the train falls down.  Because of my long hair you can't see how everything attaches at the back of my neck, which means it doesn't have to look nice!


Final photo that Ryan took outside my house.


All together I spent about $20 on material, and used maybe $1-2 worth of supplies that I already had (craft foam, spray paint, hot glue, etc) and it took about 5 hours.  That was 5 hours I COULD have spent working on my DragonCon costume, but it was worth it.

In the end, it turned out that Ryan had sort of misread the party invite, and it was actually a Toga party with Game of Thrones themed corn-hole boards.  Oh well, at least now I have a Shae costume that I can pull out again for DragonCon if I want.

Uber Pants

I have been looking for a specific style of pants for years now, and can never find them.  The pants I wanted must meet three criteria:

1. Wide, low-tension, elasticized waist band.  I like just being able to slide pants on and off.  Plus, a wide waist band with low elasticity is fairly slimming, without pinching at the sides, or buttons poking out if you're wearing a shirt that's fitted around the waist.

2. Moderately fitted through the hips and butt, but fairly loose legs.  I didn't want drop crotch formless harem pants, but I didn't want ass-hugging yoga pants either.

3. Mid calf-length, gathered, elasticized cuffs.  I like mid-calf length pants as I think they still look business enough to wear to work in the spring/summer/fall, but casual enough to wear out.  They also make my legs look a bit longer.  I also wanted a gathered and elasticized cuff as I think that looks my slimming to the leg than a straight leg open cuff.

Not being able to find these pants anywhere, I decided to make my own.  I got inspired to do this while working on my DragonCon 2014 costume, which involved making a pair of pants fairly similar to these.

I had a pair of jogging pants that had a similar fit to what I wanted for the butt/hips, so I used those to draft a basic shape, which I then spend about 3-4 iterations pinning and trying on.  The waist should be about 1.25-1.5 times as wide as the widest part of your hips, so that you can gather the material and still be able to slide them on.  The crotch and legs you can taper and fit however you prefer.  Start by cutting them loose and then pin and adjust.  Sew the back and front seams together once you have the fit right, and then make one big stitch along the inseam from cuff to cuff.   I didn't take pictures of this part, but you can google some basic pants making tutorials.

When I was finally done I of course didn't draft the pattern onto paper to save, so now I'll have to do this all over again if I want to make another pair.  I'm something kind of dumb that way.

I made cuffs and waist band out of a stretchy spandex blend that I found in the activewear section at Joann's.  Basically cut a strip twice as wide as you want and about 10% shorter (depending on how stretchy your material is you can make it up to 20% shorter.)  Double it over with the good side facing in, so you now have it as wide and long as you want, and sew along the edge.  Turn it inside out and sew the ends together.


Next step is to "gather" the waist and the cuffs of the pants.  The easiest way to do this is with a sewing machine, but just google gathering fabric if you'd like to look at other ways.  Turn the tension on your machine as high as it will go, and your stitch setting as long as it will go.  When you start sewing don't do an overlap stitch, you want the thread to be able to move.  Sew all along the edge you are gathering, and as you do, hold onto your thread lightly to add more tension.  The fabric will get pulled through the machine, but the thread will advance very slowly, gathering up the fabric on the stitch as you go.  Leave extra thread at both ends, and then you can slide your gathered fabric along it as needed to increase or decrease the amount of gather.


With your waist and cuffs gathered you can attach the waist band and the cuffs.  With your pants right-side out Turn your elastic bands so that the part of the band that will face into your body is facing out (this should be the side that has the rough edges of the two ends sticking out.)  Slide the band over the waist or the cuffs so that the edges are aligned.  Then stitch these edges together.  When they are attached you can then fold the band up and will have a nice seam with no edges sticking out.  Remember to do this with a zig-zag stitch so that the elastic can stretch.  Here's what the elastic looks like pinned on.


Finished pants!


Sunday, November 17, 2013

S-tea-gosaurus

As a lover of tea since a young age, I thought it was inappropriate that I did not have a tea-cozy for my tea pot.  As a lover of dinosaurs since a young age, I thought, why not combine these passions?

I present my s-tea-gosaurus


It's not 100% was I imagined when I started this project, but it was a good first draft I think.  I cut two basic arced shapes based on the size of my kettle and I pinned to two sides together inside out.  Then I made triangles out of craft foam, inserted them between the two sides, pointing towards the inside, so that when I sewed the edges together I would also be sewing in the bottom of the triangles.  I made a little heat and tail and filled them with stuffing, and again, inserted them between the two sizes of the cozy, facing in, so that they would be sewed into the main stitch.  Run the whole thing threw the sewing machine and turn inside out.  Voila!

*Edit: My Dog Heidi also liked the s-tea-gosaurus and decided to pull it, along with a pot half-full of tea, off the counter, shattering the pot, spilling the tea, and then chewing off Mr. s-tea-gosaurus's head.  Back to the drawing board.

Thursday, November 7, 2013

Gadget Hackwrench, Bea Arthur, and a bit of Wonder

When my boyfriend mentioned that I reminded him a little bit of Gadget Hackwrench, from Chip N' Dale's Rescue Rangers I knew it would have to be my next costume.  A great show from my childhood, plus a fun, smart female engineer?  It's perfect!

Act I - Gadget


I got distracted and didn't take very many pictures of the process, so this will be a description heavy post, my apologies.

The first step was to make the ears.  I wanted them to stand up, and also be bendable but hold their shape.  To do this purchased some crochet mats and some mid gauge wire.  I cut the shape of the ears, attached the wire to the mats by sewing around the wire through the holes in the crochet mat.


Next I made the outside of the ears out of felt, using a pink felt for one side and a light brown felt for the other.  I traced the outline of the inner piece onto the felt, pinned the two pieces together, and cut just outside of the line.


With the pieces still pinned together I sewed along the traced line, along the sides and top, but not the bottom.  You need to leave that open to turn it inside out.  Turn the ear inside out, fold the inner piece and slide it up into the ear.  Then you need to slip stitch closed the bottom.  Although using a perfect slip stitch isn't that important, since nobody really sees the bottom of the ear once it's on your head, so close it however you like.


Finally, attach the ears to a headband of some sort.  I used a combination of hot glue and a staple gun.

Next I got a pair of super cheap welding goggles from Amazon.  It was actually listed in the description that they were great for steampunk cosplay, ha, I don't think too many people were buying these for actually welding, they were so cheap I would not trust my eyes to them.  I spray painted them dark blue like Gadget's, and added a black elastic strap.


Alright, that's the end of the in-progress photos for Gadget, sorry.  I got a pattern for a 70s eara jumpsuit off eBay for $2.50, but then I decided to just purchase some cheap $15 coveralls from Amazon an dye them violet.  I tailored it a little bit, as it was fairly baggy, and then sewed on a tail, which was just a tapered tube of brown felt filled with stuffing.  I made a belt out of some purple stretchy fabric I had left over from something else.  I just made a basic tube a few inches longer than the circumference of my waist, hemmed the ends, and then put a strip of velcro on each end.

I also made an over-sized wrench out of cardboard.  I drew the shape of my wrench onto a piece of cardboard and cut it out three times.  On two of the pieces I cut out some teardrop shaped holes in the handle portion.  This would give the wrench some 3-dimensional shape.  I also cut a whole in each piece where the winder would be, and made a winder out of a toilet paper tube wrapped with thick thread.  I glued the whole thing together and gave it a metallic look using the same technique as in my Yuffie post (spray painting silver and then brushing in different colours for texture.)  Picture of the final costume after act II.

Act II - Bee Arthur

My boyfriend can't sew, but he does come up with good costume ideas, and when he does, I feel it's my duty to help them come into being.  This year he wanted to be "Bee Arthur".  No, not Bea Arthur the golden girl, Bee Arthur.  As in, King Arthur as a bee.  Well alright then.

I made a basic yellow tunic in the style of Monty Python's King Arthur, which I thought was the most appropriate inspiration for a silly pun costume.  I also purchased a large grey waffleknit shirt at Burkes for $8, which gives the look of chainmail underneath.


I cut some strips of black felt and used it as a bias tape for the edges, and then made some black stripes.  I was running short on time so I glued them on instead of sewing them.  I found the crest for the "Bea" family online and printed that out onto an iron on transfer.

I made a crown out of glittery gold corrugated cardboard, and added antennae made from twisted pipe-cleaners with pom poms on top.


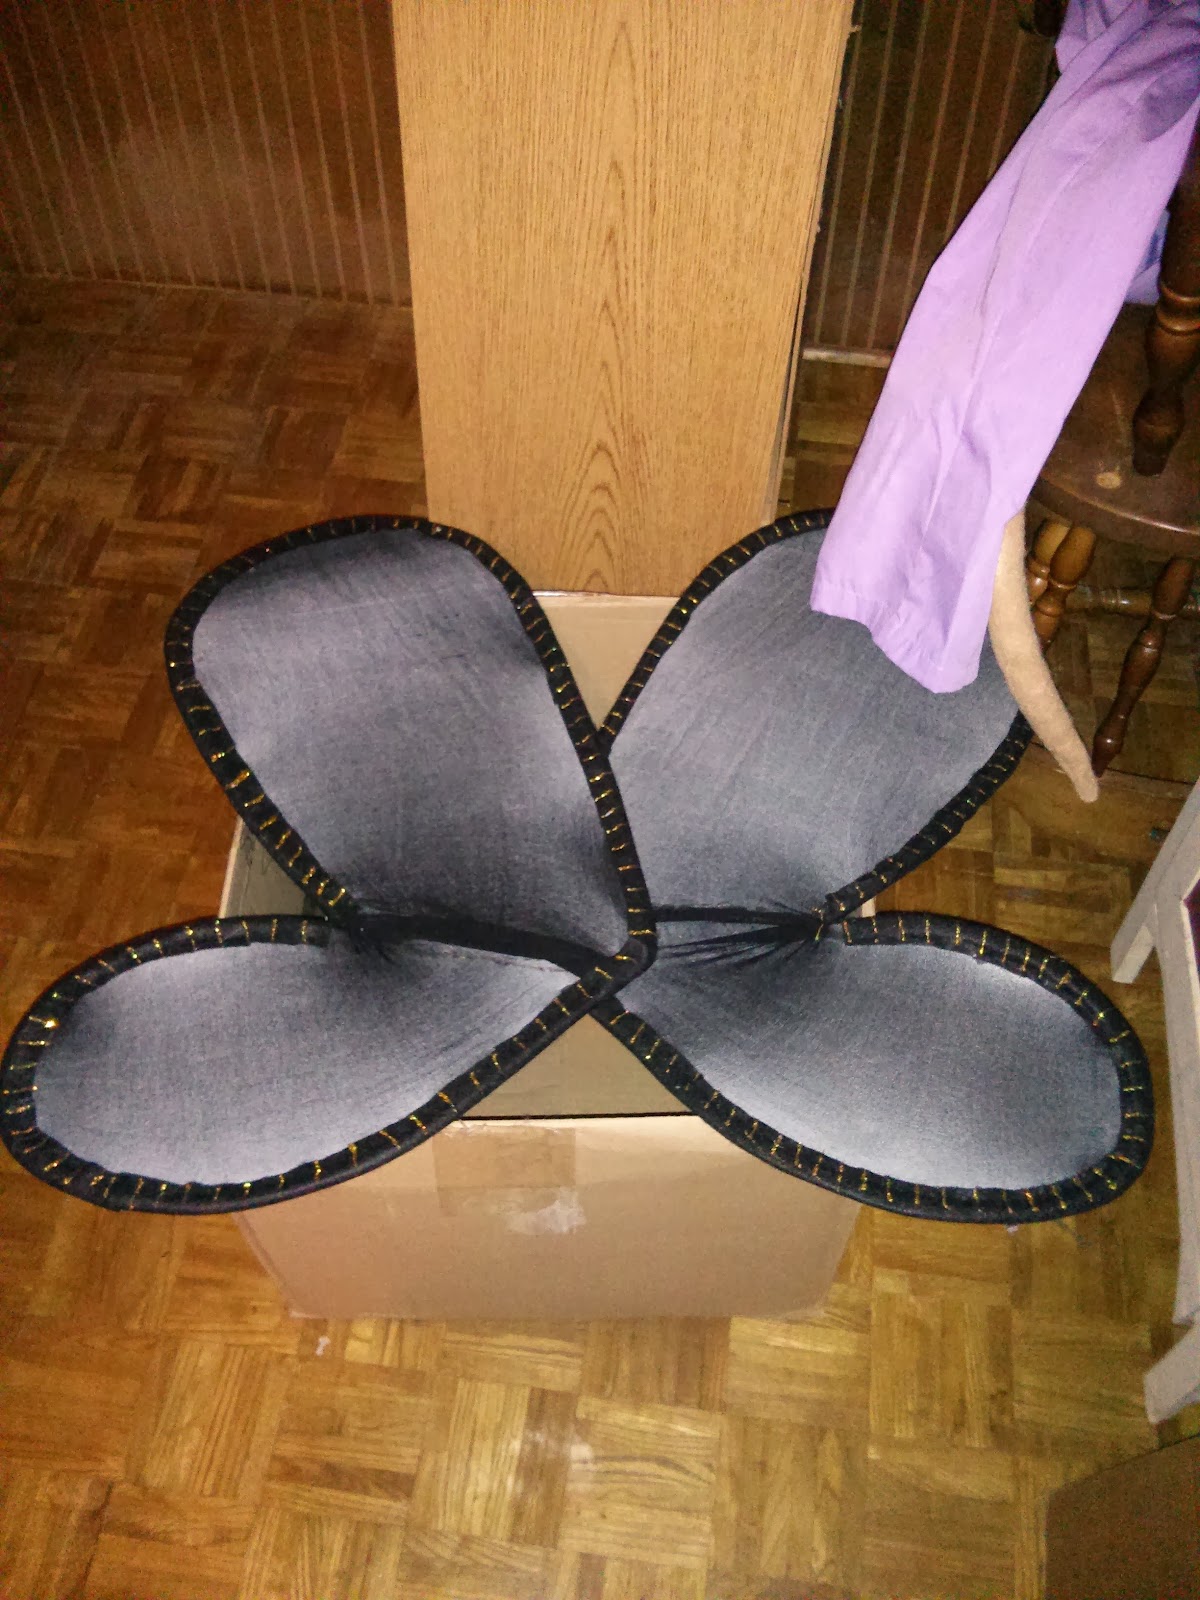
I made what I thought were some lovely wings for Bee Arthur out of shaped wire and old nylon pantyhose.  I used felt for the edges and then added painted detail.  They were a bit large though and we didn't want to be knocking people over at the crowded party, so I ended up buying some small childrens fairy dress up wings at Dollar Tree instead and spray painting them. Here's the larger ones though, we'll use them for something in the future.


Final step of this was making a scabbard for Ryan's plastic sword, which I made out of a bit of faux-leather I had left over from my Yuffie costume.  It's basically just a loop at the top to go through his belt, and an angled sheath/loop attached to that.

Here's the two of us in all our glory at the party.  I think it worked out quite well.


Epilogue - Wonder Woman

A coworker of mine casually mentioned that she was going to dress up as Wonder Woman for a party at her house this year, and that she was still trying to find bracers to go with the outfit she bought.  I offered to make some for her instead.

It was pretty simple.  I cut some yellow craft foam into a sort of trapezoidal shape and rolled it around my arms to make sure it was the right dimensions.  Along the top and bottom of the trapezoid I glued some bendable wire (I forget what gauge it is, I just know what it looks like at Home Depot, this stuff is great for crafting anything that you want to hold shape but be poseable!)  Then I glued another trapezoidal shape on top that was slightly larger in each dimension (as it will be the outer piece and have a slightly larger radius of curvature.)

Next I bent the wire until the cuffs were the shape I wanted them to be and I trimmed off the excess.  I added a panel of craft foam a few inches side on the edge of one of the sides, that could cover the gap between where the two edges meet.  This allows you to adjust how far open the bracers are, for different sized arms, without showing any arm underneath.

I spray painted both cuffs gold.

Next I cut out red sparkly stars out of craft foam and glued those onto the bracers.  Finally I made holes along the edges of the bracers (not in the panel, on the edges of the main trapezoid) and threaded through some red yarn for lacing up the bracers.


And there you have it.  Two full costumes and one accessory.  Sorry for the lack of progress pictures related to Gadget, I hope it still makes sense.