At dinner on Friday night I finally decided to inquire about when/where the party was being held. He told me, and then added, oh ya, and it's a Toga/Game of Thrones themed party and everybody will be in costume...He told me this less than 24 hours before the party. He seemed to think that I would be OK going to a costume party, themed along one of my favourite book series', and NOT wear a costume. He does not know me as well as I thought.
So, on the way home form dinner around 9pm I start wondering what I can put together cheaply and quickly. Shea was the first thing that came to mind, as we have a similar hair style and her dress is not very fitted. It's a halter style backless sack dress with a belt and a sort of mini cape-like scarf thingy down the back.


JoAnn's is usually my fabric shop of choice, but they were closed by the time I headed home on Friday night, so I headed to the only place that was open, Wal-Mart. Not my favourite place to shop, but I was on a deadline, and as I was playing tennis in the morning, I wanted to get at least half way done tonight. I grabbed 4 yards of a surprisingly cheap satin-like pink fabric, half a yard of a flowery pink fabric that was slightly stretchy, a spool of pink thread, a roll of a cream ribbon and a yard of a cream and gold cord. All for about $20. Not bad.
I laid out the fabric, still folded in half, and cut it to the length I wanted, the length from my collar bone to my ankles. I then cut it (still folded remember) into a sort of trapezoidal shape, with a bodice about 24" wide (12" folded) and 12" deep, and then cutting on an angle of about 45 degrees out to the edge. I made two pieces of this shape.


Next I sewed the two pieces together along the sides, all the way along the straight edge on the bottom, the angled edge, and then about half way up the straight edge of the bodice. This will become the sort of "armpits" of the dress. On the section of fabric which would become the back of the dress I cut a scoop back between the two armpits, scooping down about 6". I then tried on the dress, holding the "armpits" in place, and pinning the back approximately where I would want it at the small of my back. I cut out a bit more scoop, and then pulled the fabric in a bit as it was too loose. I hemmed all the open edges at this point, other than the bottom. Here's what the back looked like after the first scoop cut. I ended up making this a bit more triangular and pulling the fabric in a bit.

Next I folded over the top edge of the front of the dress to make a channel for the cord. Then I gathered this channel (see my "Uber pants" post for a description of how I gather fabric), threaded the cord through, and hot glued the ends of the cord into the channel so that it wouldn't slide around. On this photo you can also see how I opened the back up a bit more and also pulled the fabric in a bit to make the back less loose.

No photos of how I added the ribbon along the front, but I just cut two pieces as long as the length of the dress and hot glued them to the front. It's not rocket science people.
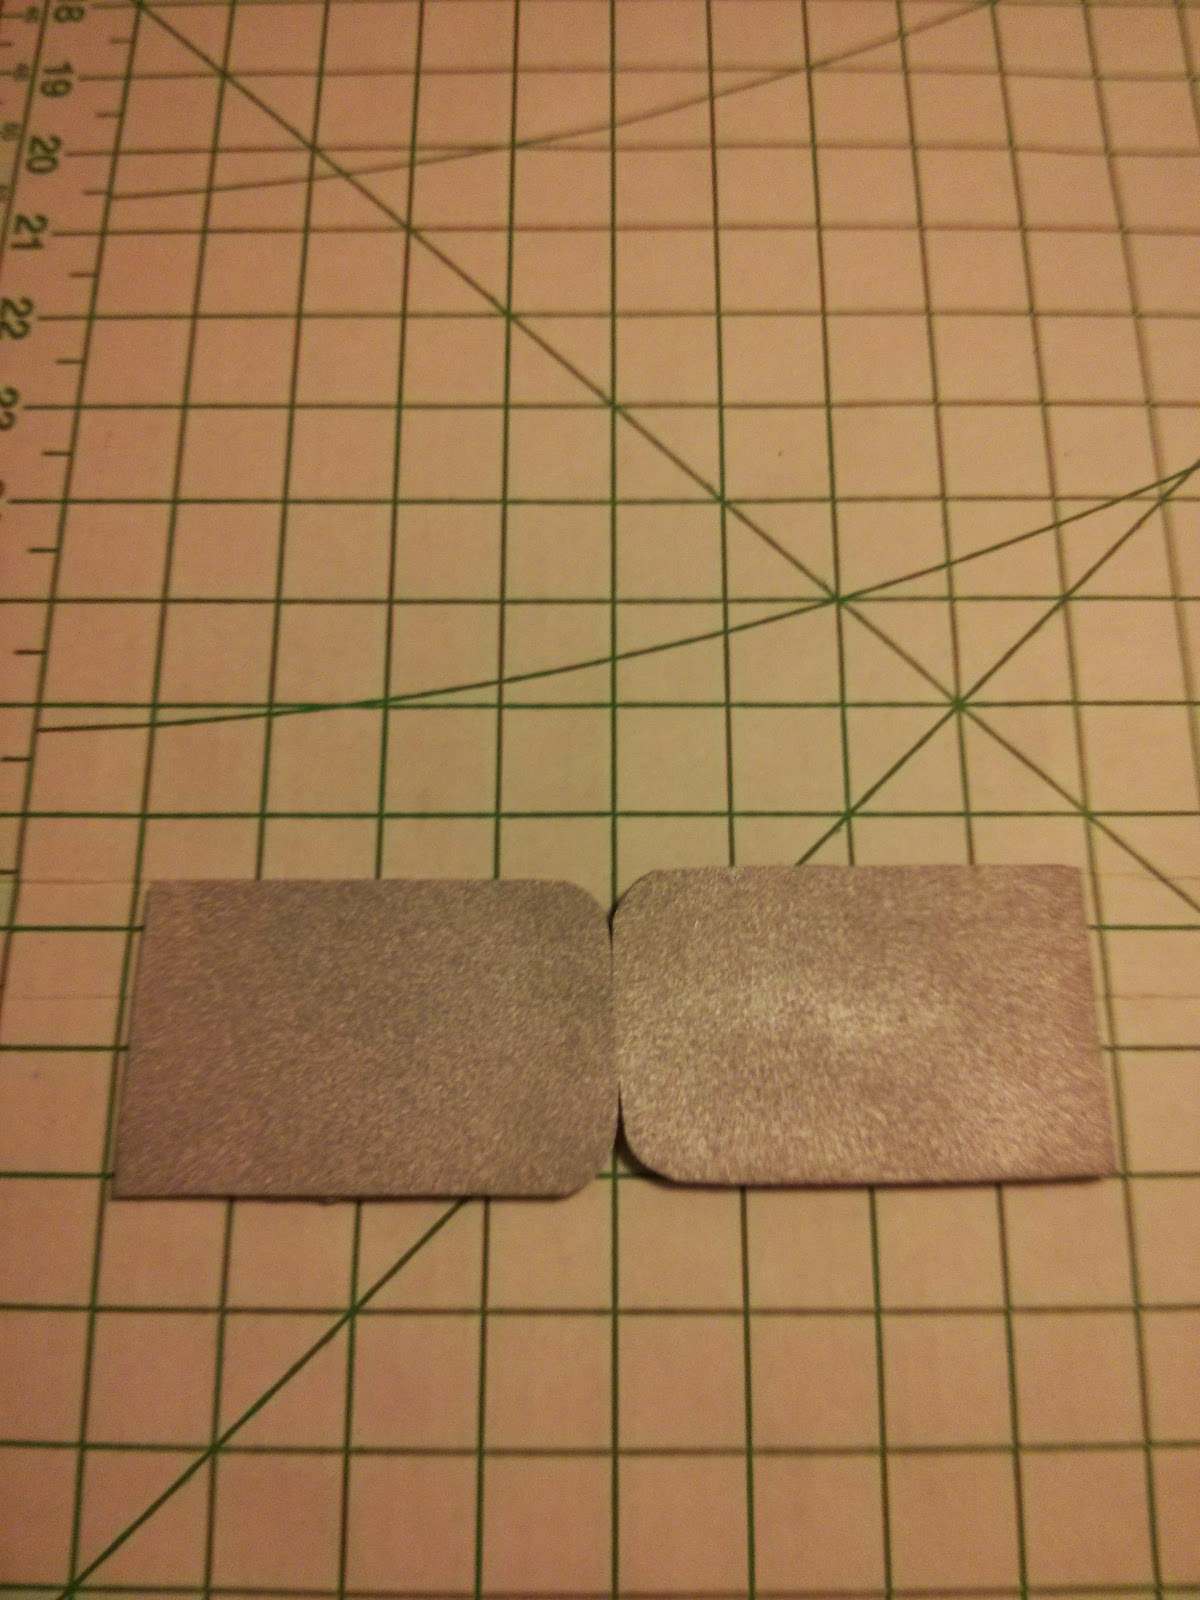
Along the way I started making the belt. I didn't want to blow $20 on a nice belt clasp for this costume, so I made one out of craft foam. I cut two pieces of cheap craft foam in the shape of the two belt clasps, and also a piece that would be as large as the two pieces end to end. I used a spray adhesive to glue the two buckle pieces onto the larger piece, and trimmed away the excess so you couldn't see the backer piece underneath the buckles. I used my hardcover copy of A Dance With Dragons to press them down, which I thought was appropriate. After about 10 minutes under the book I spray painted it silver.

To make the belt I cut a rectangle a little bit longer than the circumference of my waist and twice as wide as I wanted, then doubled it over with the good side on the inside, sewed the edges together, turned it right side out, and then hemmed the edges. I attached pieces of velcro to either end. Then I used hot glue to attach the belt buckle to the front of the belt. I used some black and silver paints and some sequence I had sitting around to add a bit of detailing to the buckle.

Finally I made the cape/scarf/train thingy that hangs down the back. It's basically just a rectangle as long as the length from my shoulders to my ankles, and about a foot wide. I hemmed all the edges and then made a little loop at the top so that I could attach it to my halter.
Speaking of the halter, I worried about it coming undone if I just tied it at the neck, so I tied two bowline knots in each end, leaving a small loop, and then used a small carabiner to hold the two loops, as well as the loop holding my cape/train/scarf.
Here's a photo showing how the train falls down. Because of my long hair you can't see how everything attaches at the back of my neck, which means it doesn't have to look nice!

Final photo that Ryan took outside my house.

All together I spent about $20 on material, and used maybe $1-2 worth of supplies that I already had (craft foam, spray paint, hot glue, etc) and it took about 5 hours. That was 5 hours I COULD have spent working on my DragonCon costume, but it was worth it.
In the end, it turned out that Ryan had sort of misread the party invite, and it was actually a Toga party with Game of Thrones themed corn-hole boards. Oh well, at least now I have a Shae costume that I can pull out again for DragonCon if I want.
No comments:
Post a Comment