Note: I have recently transitioned from blogspot over to my personal site Illudium.net
No further posts will be made on this blog.
Saturday, October 31, 2015
Sunday, September 20, 2015
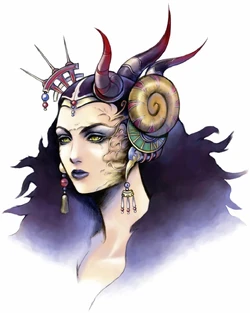
Edea Kramer (Final Fantasy VIII)
This year for DragonCon I decided to tackle yet another Final Fantasy character (see Yuffie and Kefka from previous years.) Wanting to both stretch my crafting skills, as well as explore a character from another of my favourite games, I settled on Edea Kramer from Final Fantasy VIII.


Oh, no problem, just learn how to sew plunge necklines, make gradient fabrics, work with clay, beads, organza, magnets, and foam board. It was going to be a challenge, but that's 90% of the fun for me, learning something new, a figuring out how to build something that both captures the character, and is wearable.


Oh, no problem, just learn how to sew plunge necklines, make gradient fabrics, work with clay, beads, organza, magnets, and foam board. It was going to be a challenge, but that's 90% of the fun for me, learning something new, a figuring out how to build something that both captures the character, and is wearable.
Part 1: Helmet
First thing to tackle was the helmet. Primarily because I had no freaking idea how I was going to do this. I had never made anything even remotely similar to this before. Should I use a pre-formed helmet and add props, or make it from scratch? If starting from scratch, what materials do I use? Worbla, paper clay, bondo? These words were mostly giberish to me. I agonizing over this for about a month, I needed something that was fairly light, but that was also forgiving to work with, since I was a complete newb. Not having a mold of my head, I decided to start with paper mache to make my base, since I could apply it directly to my head. I'm going to spend the most time discussing the helmet, as it's the most intricate piece of the costume, and it's where I spent most of my effort.
So here's my smiling mug in about March of 2015. I started early to give myself lots of time to screw up. I covered my head with tinfoil and just started layering. I didn't make it too thick, maybe 4 layers. Just enough that it wouldn't deform too much. Once completely dry I trimmed it to shape, including the peak at the front, notches for my ears, and a large notch at the back. Make sure you can move your head back and forth without it pinching your neck. Then I got a foam head from JoAnn's to set this on to work with.
Next, horns. I swear I took pictures of this process, but unfortunately I messed up the reformatting of my phone back in the spring and lost a bunch of pictures that I hadn't backed up. Now all my photos go directly into the cloud hivemind. Whether this is a better system or not, I'm not so sure,..
To make the horns I started with tinfoil. I wanted a very light core, to minimize the weight pulling the helmet to one side or another. I crumpled it up and formed it into a very basic shape, then covered it with a few layers of paper mache. This worked out very well, as I could continue to shape and form the horns while I was layering on the paper. The final horns were stiff enough to hold shape, but not so stiff that I couldn't do very small adjustments with force. Then I glued the horns onto the cap. Do them one at a time, and make sure to mark your locations. You don't want to have to pull them off and re-glue. Try the helmet on after each time to confirm the locations. Here's the only picture I have of the helmet at this point. It's not a good angle, sorry. Also in this photo you can see a very early dress prototype. Just testing out the plunginess of the neckline.
Once I was very VERY happy with the helmet (seriously, there's not much opportunity to fix the shape after this point, make sure it's perfect) I moved on to the clay. I had never worked with paper clay before, but I absolutely loved it! I used creative paper clay, which is about $12 a pound from Amazon, and I probably used two pounds total on the helmet.


On the first day I covered the whole helmet with the clay, including the horns. This was a bit of a mistake, as the weight of the clay on the horns caused them to sag. Remember how I said I had no idea what I was doing with this stuff? I wasn't being modest :/ If doing it again I would clay only the cap and base the horns at first, and get them properly reinforced, then only proceed to clay the rest of the horns a few inches at a time once the base was dry. You can easily join pieces together with a bit of water, so no need to do it all at once.
The clay shrinks as it air dries though, so you will get cracking. Lots and lots and lots of cracking. I spent at least a week patching cracks, maybe two. I would come back to it every day and use a tiny trowel to shove more clay into little cracks, and smooth them over. Keeping it moist helps to smooth the surface, and the smoother it is now, the less sanding later, so keep water handy. Then it was another few weeks of sanding, patching little dimples with more clay, lather, rinse repeat. I probably could have kept smoothing for all of eternity, but at some point you have to say enough is enough. I sealed the whole thing with Gesso.
I used painters tape to mark off some sections and then went to town. I started with the purple base, and then layered in some wine colour on the horns. All of the paints were just basic acrylics from the craft store. I used some black and silver sharpies for a bit of detailing, as I'm really a terrible painter. I added a ridge of craft foam along the peak of the helmet and painted that gold.
With the helmet painted it was on to all of the little bits. Again, unfortunately a lot of these pictures were lost during the great phone reformatting of 2015. I started with the two big green wheels on either side of the helmet. I made the circles out of craft foam, then used paper clay to make the large ridges along the outside and the inner circle, and I used puffy paint to make the lines connecting the inner and outer circles. Seal and paint. Dry brush on a bit of black and grey to make it look a bit worn. Next.
The gold spiral thingy on her left I used a similar technique to the horns to keep it light. I made a core out of aluminum foil and covered it in paper mache to get a basic shape, then used paper clay to make the final shape. This was an iterative process over a week or so layering on clay, smoothing it out, digging little channels, etc. Seal, paint, dry brush for a work look.
The little claw/dagger thingy hanging on the left side is entirely paper clay. Make the base shape first then layer on a bit of detailing. Seal, paint, dry brush.
The spiky thing on the right hand side I made out of a few different materials. I started with large craft sticks (essentially large popsicle sticks) that I cut to shape, then I used paper clay to create the edging, and stuck a toothpick in the top of each one while it was still drying. Once dry I sanded it to the right shape, sealed, painted. The cross bars are extra thick craft foam.
All of the various beads and jewels are pulled apart from various cheap necklaces bought at a dollar or craft store and restrung on stretchy cord, with a few drips of clear school glue to reinforce them on the cord.
Attach all these little bits and bobs with Quick Hold contact adhesive. HOW DID I NOT KNOW THIS EXISTED BEFORE!!! It's by the makers of E6000, which is what you use in the craft world when you absolutely gotta get shit held together no matter what. But it takes a while for the bond to strengthen. Quick Hold is almost as strong, but you get a perfect bond in just minutes. It's amazing.

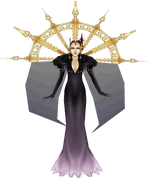
And here's the final product. The final fit was quite good. I added a bit of padding into the helmet to make it sit a little higher on my head. I should have adding a bit more padding on the left side, as this was the heavier side, and it tended to tilt a little in that direction. Overall though it was not particularly heavy, and I comfortably wore it for half a day, two days in a row.


Part 2: Dress
I'm actually not going to say too much about the dress. I didn't start it until about 2 weeks before DragonCon, and I'm overall not that happy with it. I was really rushed. It's made out of a stretchy polyester material, I cut a basic shape for the back and upper skirt and then drafted the pattern for the neckline myself and added some darts to make it fit around the bust. I didn't really know how to make a plunge neckline and I don't think I did a very good job, so I'll likely re-do the dress at some point. I bought a few yards of pre-strung black feathers (i.e. the feathers are already attached in a line) and sewed them around the neck and shoulders in a few layers, with the inner layers covering up the edges of the outer layers. Then I used black bias tape to cover up the edge of the inner layer. For the lower skirt I made a basic flare skirt out of a wine coloured polyester and used "Design Master" black spray paint to create the gradient. Design Master is a great brand of spray paint for fabrics, as it goes of extremely light. You can also use fabric paint, but I find the spray bottles they come in are terrible. I paired this with basic black stretchy gloves and some black heels, since I definitely do not have legs as long as any woman in any video game. I added claws to the gloves, but later took them off. I opted to lose a bit of the character for better functionality. The dress requires a plunge bra and lots of dress tape. Lots. Apologies in advance for the terrible bathroom selfie.

Part 3: Back Piece
The back piece was again something entirely new to me. I wasn't too sure where to start. Wood? Cardboard? Plastic? Dowels? Vinyl? Foamboard? How will I attach it? How will I move while wearing it? How will I fit it in my tiny hatchback along with our 9 other costumes, cooler, and other luggage to make it to DragonCon? I settled on foamboard for the entire thing, with a tiny bit of styrofoam added to make a wedge that held it out from my back a little bit (this was needed because I found the back horn from my helmet was hitting the backpiece, so I added the wedge to angle the back piece out away from me, giving me room to turn my head.)
The cool thing about the back piece, or at least the part that I think is cool, is that it's made in three parts, that attach with magnets. Magnets bitches!
The tedious part was cutting it out. First I cut out all seven spikey pieces from foam board with an exacto knife, Something I learned after the first few spikes is that you need to change your blade constantly. After the blade starts getting dull it's so much harder to cut, and your edges will come out really chunky. To get a smooth edge I started changing the blade after each piece.

Here's a pretty good in-progress photo showing all seven spikey pieces (there go my eloquent descriptions again), and the start of the connectors. Once the spikes were done I cut out a semi circle and sliced it into three segments and glued the long spiky pieces onto the segments in the final layout that I wanted. Then I made my six connecting pieces. Make sure to number your spikes and connectors segments so you know what order they go in, because they won't all be perfectly identical. As you can see here I didn't perfectly space my spikes, and the second segment from the right ends up being a bit short. Anyway, once the connectors were done I glued them to the spiky pieces, but NOT at the two gaps where the semi-circle segments come together. So, if you were to look at the pictures above and label the joints of spike to connector from left to right as 1 through 12, I left 4 and 9 unglued, leaving me with three completely separate pieces.
To join the three pieces I used tiny magnets embedded into the cross section of the foam board. This would allow me to disassemble the back piece into three separate pieces for transport, or to more easily move around the con floor. It also meant that if somebody knocked into my backpiece that instead of bending and potentially breaking it, the side piece would just snap back, and either fall off, or snap back into place, depending on how much it was displaced. I purchased neodymium magnets from K&J Magnetics Inc. I came across this company when purchasing neodymium magnets from some nuclear science and engineering educational outreach that I do. I'm glad I bookmarked the site, as their selection is amazing! The magnets I used were fairly small, so that they could fit into the cross section of the foam board. I used two sets of two at the top, in the connecting pieces, and two sets of two at the bottom in the semi-circle segments. I attached the magnets one one side first, then pressed the parts together and marked the connection point in the other side, before attaching the magnets in the other side, to make sure I aligned them correctly. I dug out a small hole into the foam and then dripped in a bit of glue, pressed the magnet in, and then covered it with some more glue. Be careful what kind of glue you use as a lot of it will eat through foam. I used a few different types through this process as an experiment. E6000 definitely eats through the foam. If you seal it with gesso first it's not as bad, and is what I used on about half of these. School glue doesn't eat through the foam, but isn't as strong. Gorilla glue is strong AND doesn't eat through the foam, but it expands quite a bit, and it's hard to get the perfect amount. Overall I think school glue worked best.


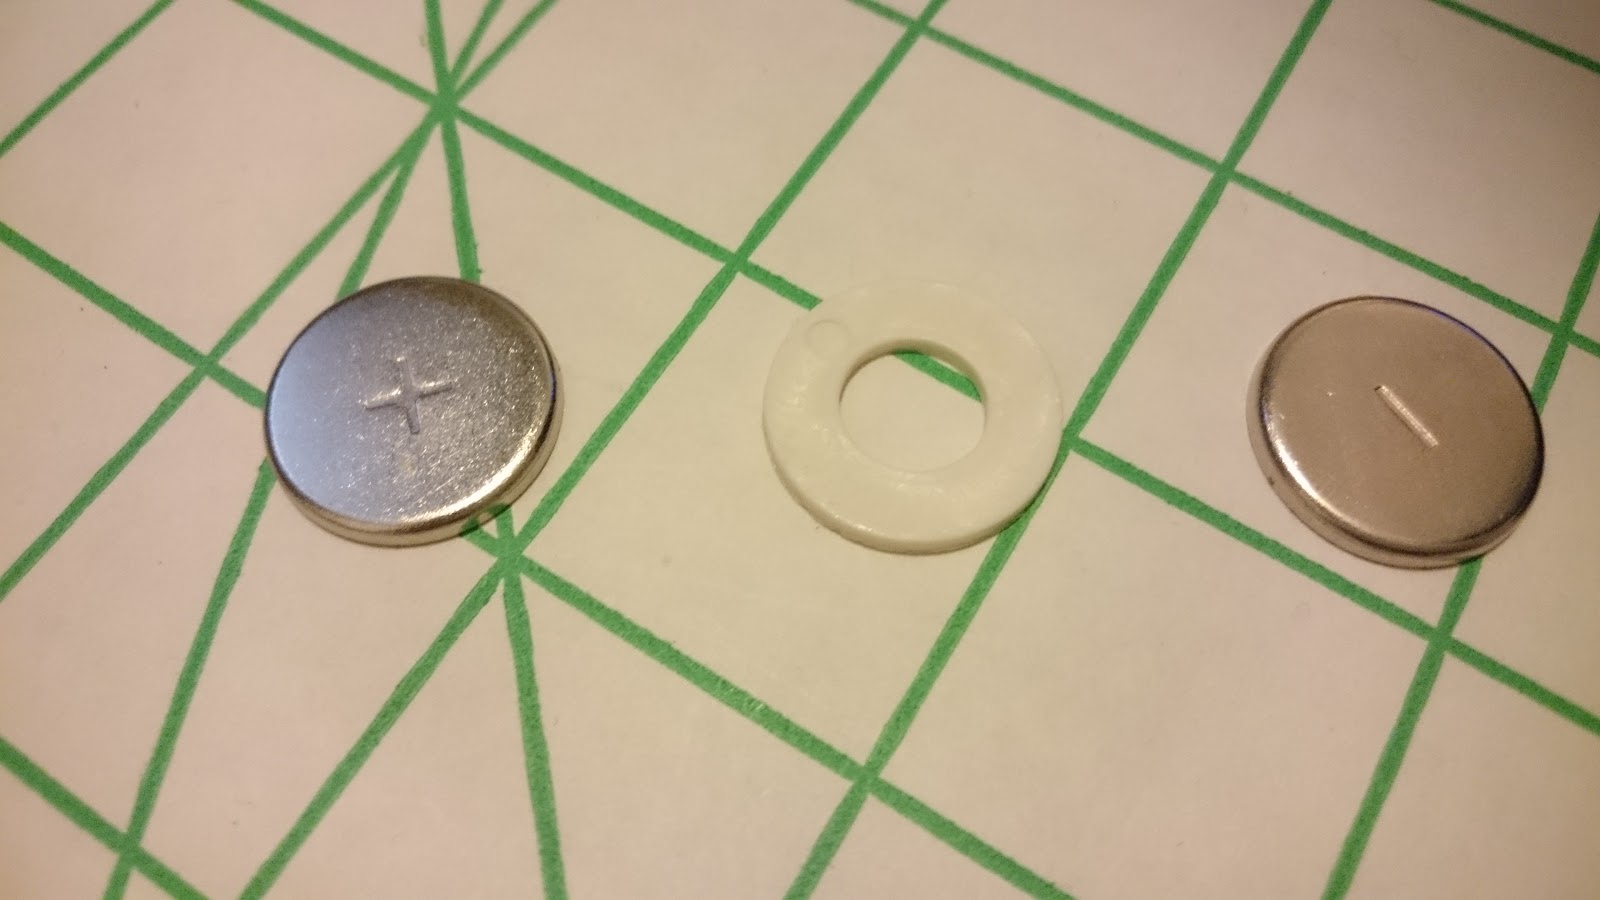
Here are a few pictures of the magnets once inserted into the foam board (these pictures were obviously taken after painting, but I did the magnet insertion before painting.) The far left picture shows the magnets in one of the semi circle segments. The center pictures shows them in one of the connecting pieces. The right picture shows them in one of the spiky pieces. When you press the piece in the center to the piece in the right picture, those magnets will snap together. Remember, magnets have poles! When you're putting in your magnets make sure you put them in facing the right direction, otherwise your pieces will repel, not attract.
Now, those small magnets hold the three pieces together, but what holds the pieces to me? More magnets! I purchased some larger "sewing magnets", again from K&J Magnetics. Sewing magnets come in pairs and are very strong, meant to be attached to each other through layers of fabric.


The little coloured dots in this photo are little dabs of paint. I did this so that I could then press the back piece up against the bodice and transfer the paint onto the backpiece, showing me where to put the magnet into the back piece. As I mentioned at the start of this section. I needed to make the back piece angle away from me, so that I didn't hit it with my helmet. I did this by carving a wedge out of styrofoam (an electric turkey carving knife works great for this) and gluing the middle back piece to this wedge. I then attacked all of the negative halves of the magnets into the styrofoam backpiece. Again, I tried different types of glue here, with varying levels of success. I was really worried about the magnets ripping out of the styrofoam, so I cut rectangles of craft foam and glued these over the magnets. This reduced the pull of the magnets a bit, so I used more magnets than I originally planned, but giving more surface area for the glue held the magnets into the stryfoam better. One or two of the magnets ended up coming loose under the craft foam during DragonCon, but nothing fell apart as the craft foam held it all in. I also attached a few more of the rectangle magnets into the face of the side pieces, and into the styrofoam wedge, so that the side pieces weren't held to the main piece only by the magnets in the cross section. I didn't take any pictures until I had already painted everything, so sorry but it's hard to see some of the magnets. They look like little bumps/distortions in the bottom picture.


Tom at Pixelated Images got a lovely close up of my make-up on Sunday night.
The tedious part was cutting it out. First I cut out all seven spikey pieces from foam board with an exacto knife, Something I learned after the first few spikes is that you need to change your blade constantly. After the blade starts getting dull it's so much harder to cut, and your edges will come out really chunky. To get a smooth edge I started changing the blade after each piece.

Here's a pretty good in-progress photo showing all seven spikey pieces (there go my eloquent descriptions again), and the start of the connectors. Once the spikes were done I cut out a semi circle and sliced it into three segments and glued the long spiky pieces onto the segments in the final layout that I wanted. Then I made my six connecting pieces. Make sure to number your spikes and connectors segments so you know what order they go in, because they won't all be perfectly identical. As you can see here I didn't perfectly space my spikes, and the second segment from the right ends up being a bit short. Anyway, once the connectors were done I glued them to the spiky pieces, but NOT at the two gaps where the semi-circle segments come together. So, if you were to look at the pictures above and label the joints of spike to connector from left to right as 1 through 12, I left 4 and 9 unglued, leaving me with three completely separate pieces.
To join the three pieces I used tiny magnets embedded into the cross section of the foam board. This would allow me to disassemble the back piece into three separate pieces for transport, or to more easily move around the con floor. It also meant that if somebody knocked into my backpiece that instead of bending and potentially breaking it, the side piece would just snap back, and either fall off, or snap back into place, depending on how much it was displaced. I purchased neodymium magnets from K&J Magnetics Inc. I came across this company when purchasing neodymium magnets from some nuclear science and engineering educational outreach that I do. I'm glad I bookmarked the site, as their selection is amazing! The magnets I used were fairly small, so that they could fit into the cross section of the foam board. I used two sets of two at the top, in the connecting pieces, and two sets of two at the bottom in the semi-circle segments. I attached the magnets one one side first, then pressed the parts together and marked the connection point in the other side, before attaching the magnets in the other side, to make sure I aligned them correctly. I dug out a small hole into the foam and then dripped in a bit of glue, pressed the magnet in, and then covered it with some more glue. Be careful what kind of glue you use as a lot of it will eat through foam. I used a few different types through this process as an experiment. E6000 definitely eats through the foam. If you seal it with gesso first it's not as bad, and is what I used on about half of these. School glue doesn't eat through the foam, but isn't as strong. Gorilla glue is strong AND doesn't eat through the foam, but it expands quite a bit, and it's hard to get the perfect amount. Overall I think school glue worked best.


Now, those small magnets hold the three pieces together, but what holds the pieces to me? More magnets! I purchased some larger "sewing magnets", again from K&J Magnetics. Sewing magnets come in pairs and are very strong, meant to be attached to each other through layers of fabric.
When they arrive they have a small plastic disk between each pair. I made the mistake of letting two magnets come together without anything in between them. I never got them apart again. I sewed the positive sides of these magnet sets into a bodice that I would wear under my dress.


I painted everything using gold "Design Master" spray paint. Design Master is the only brand that I've found works with foam, everything else will tear it up unless it's extremely well sealed.
Finally I made the flowing panels from a sheer white fabric and finished the upper edge with a white bias tape, so that I had a strong edge to glue to the foam board. I don't have a serger and am terrible at sewing these fine fabrics. What I did was sew a zig zag stitch along all edges of the panels at a medium tension. No hem, just a zig zag along the raw edges. Keep the fabric taut, don't let it bunch up or you won't get a flat panel. Then trim all the edges as close as you can to the stitch, try to get all the stray fraying edges. Next light candle. Bring the edge of the fabric close to the flame, but not directly in it. Takes a bit of practice, so use some scraps first. The heat will burn up the raw edge to the thread, and make what looks like a nice rolled hem. You could probably also do this with a heat gun, but I don't have one.
Here's a few shots showing how the final assembly works.


Put it all together and add some make-up! I know next to nothing about make-up, but I managed to get a decent look using a few simple items. Use a good foundation and powder to get a smooth complexion, since no women in video games have dry skin, oily skin, birth marks, acne, spotting, or any other physical imperfection, I used a basic black/neutral eyeshadow pallet, and a purple pallet to do the eyes. No liner at all. The veins I used a white cream make-up (I had it left over from Kefka last year!) to draw them with what was I think a lip liner brush. Then I used a small eyeshadow brush to add some shading with black and purple. I don't really know enough about make-up to explain what I did, sorry. Just get a picture of Edea in front of you and start experimenting. Finish it off with some black mascara and purple lipstick.

Part 4: Seifer!
No Edea is complete without her knight, so I made a quick Seifer costume for my fiance. I purchased a used trench coat in his size and spent a few days modifying it, adding trim, cuffs, etc. I used bias tape to turn a blue t-shirt into the vest. The gunblade is what really makes the outfit through, and it was surprisingly simple. I cut the shape of the blade into two pieces of foam board, then attached them with contact cement. I shaped the blade edges and cut the small holes using a knife and sanded it. The gun part itself is made from a rubber/plastic gun that's used in disarming exercises. I used a dremel to cut part of the end off, and a knife to trim the rubber back along the top of the barrel. I glue the blade on, and then used paper clay to shape the connection. By painting the part of the barrel where I trimmed the rubber back the same colour as the blade, it looks like the blade is coming from inside the gun.


Here's my fiance rocking his costume, credit again to Pixelated Images for taking these great photos for us at con.


Part 5: Putting it all together
Not much more to say here. I really had an amazing time cosplaying as Edea at DragonCon. My fiance was a trooper about wearing that hot coat around, so thank you to him, He also acted as my sales man and kept showing people how my back piece came apart whenever they commented on it, as he was very impress by how I had engineered it. Thanks babe :)
The costume was fairly comfortable, though I did get a bit sweaty. I plan to remake the dress, and will make the feathering as a detachable overlay, so that I can wash the dress in the machine (I detest washing things by hand. I tend to put everything in the machine and if it gets destroyed, well, I didn't want it anyway!) I also need to add a bit more padding to the helmet. Oh, one last item of note, I purchased and modified a running belt to go with this outfit, as I had no pockets. I made it a bit smaller so that it could go at my waist instead of my hips, and I added a buckle so that I didn't have to pull it on over my legs. I also added a clip for my badge. This allowed me to carry around my phone, badge, and wallet without needing a bag, and it was easy to take off for photos, or just tuck my badge up under the belt.
Enough talk, here's some photos of the Final Fantasy photo shoot that we went to on Saturday

Getting ready, starting to get nervous that everything is going to fall apart as soon as I leave the room
Nice group shot here with the other Final Fantasy VII folks.
Another good group shot of the FFVIII folks, and then one of the whole Final Fantasy group. These ones are courtesy Neko7 Cosplay Photography who came and took a ton of photos of our gathering. Google them to find more great shots from the day (and the whole Con).
On Sunday evening my fiance and I decided to head down to the lower level of the Marriott and get a photo taken together by the con photographer. We wanted to have at least one good photo of ourselves to include in our upcoming cheezy wedding slideshow to make all of our family wonder what kind of weirdos we were. Unfortunately some butthole decided to steal the photographers camera, and we ended up waiting around for about 2 hours, which wasn't really how I wanted to spend my last night. However, while waiting around, fully decked out, we ran in to lots of other cosplayers that were down to get nice photos taken, and ran into some wonderful photographers, and managed to get a few more nice photos taken, all while waiting around for our other nice photo! Tom at Pixelated Images, whom I mentioned earlier, was one of such photographers. Here are a few of the shots that he took Sunday night, as well as our photos from Bryan Humphrey: Mad Scientist with a Camera.


That's it! I hope this write up is helpful to others interested in tackling these characters.
Friday, September 5, 2014
Queen Beryl
After finishing my Kefka build for DragonCon 2014 I was so excited, and so happy with how it turned out, that I decided to tackle a second project.
In my early teenage years I became pretty obsessed with Sailor Moon. And by pretty obsessed, I mean scarily manic obsessed. I owned every toy I could get my hands on. I ordered VHS tapes of the subtitled episodes that weren't available in North America. I had multiple geocities websites dedicated to the show (yes, they are both archived in the wayback machine, no I will not tell you their addresses.) With the show being rebooted I thought it would be a great opportunity to do a Sailor Moon cosplay, and I decided on the show's most iconic villain:


With my drafted pattern I went about making a prototype from scraps. This is a step that I often skip, because I'm lazy. I'm really glad I didn't this time though because, as you can see from the following photo, I definitely messed up my seam allowances in my pattern, making the half moons like crooked. Again, if you're doing something completely new, take the time to make a prototype before wasting nice fabric.

I'm not going to go into detail of making the dress, as I basically followed the instructions from the pattern. I used an eggplant satin and (near) matching lining. I sewed the bodice and bodice lining, then attached the boning to the inside of the bodice lining, then attached the lining to the outer fabric. I sewed the upper skirt and upper skirt lining, and attached them, then I attached the bodice to the upper skirt (leaving room for the zipper of course.) I attached an invisible zipper, which was a little tricky without a zipper foot for my sewing machine, but not impossible. Once I tried on everything and made a few alterations I slip stitched the linings to the seam allowances. Finally I made the lower skirt, without a lining, and attached it to the upper skirt. I let the dress sit for a few days before trying it on and making the final hem.

Because I opted not to make the plunge neckline, I decided not to use different fabric for the half-moons, as I was worried about how the dress might pull and wasn't sure if it would deform them. It turned out I probably could have used different fabric. I painted the inner halves of the half-moons with black fabric pain directly onto my dress. Then I made the outer halves (which I'll be honest, I forgot about when making the original pattern) out of some scraps and sewed them into the lining. It looks a little odd in this photo, but actually turned out to look quite nice I think.

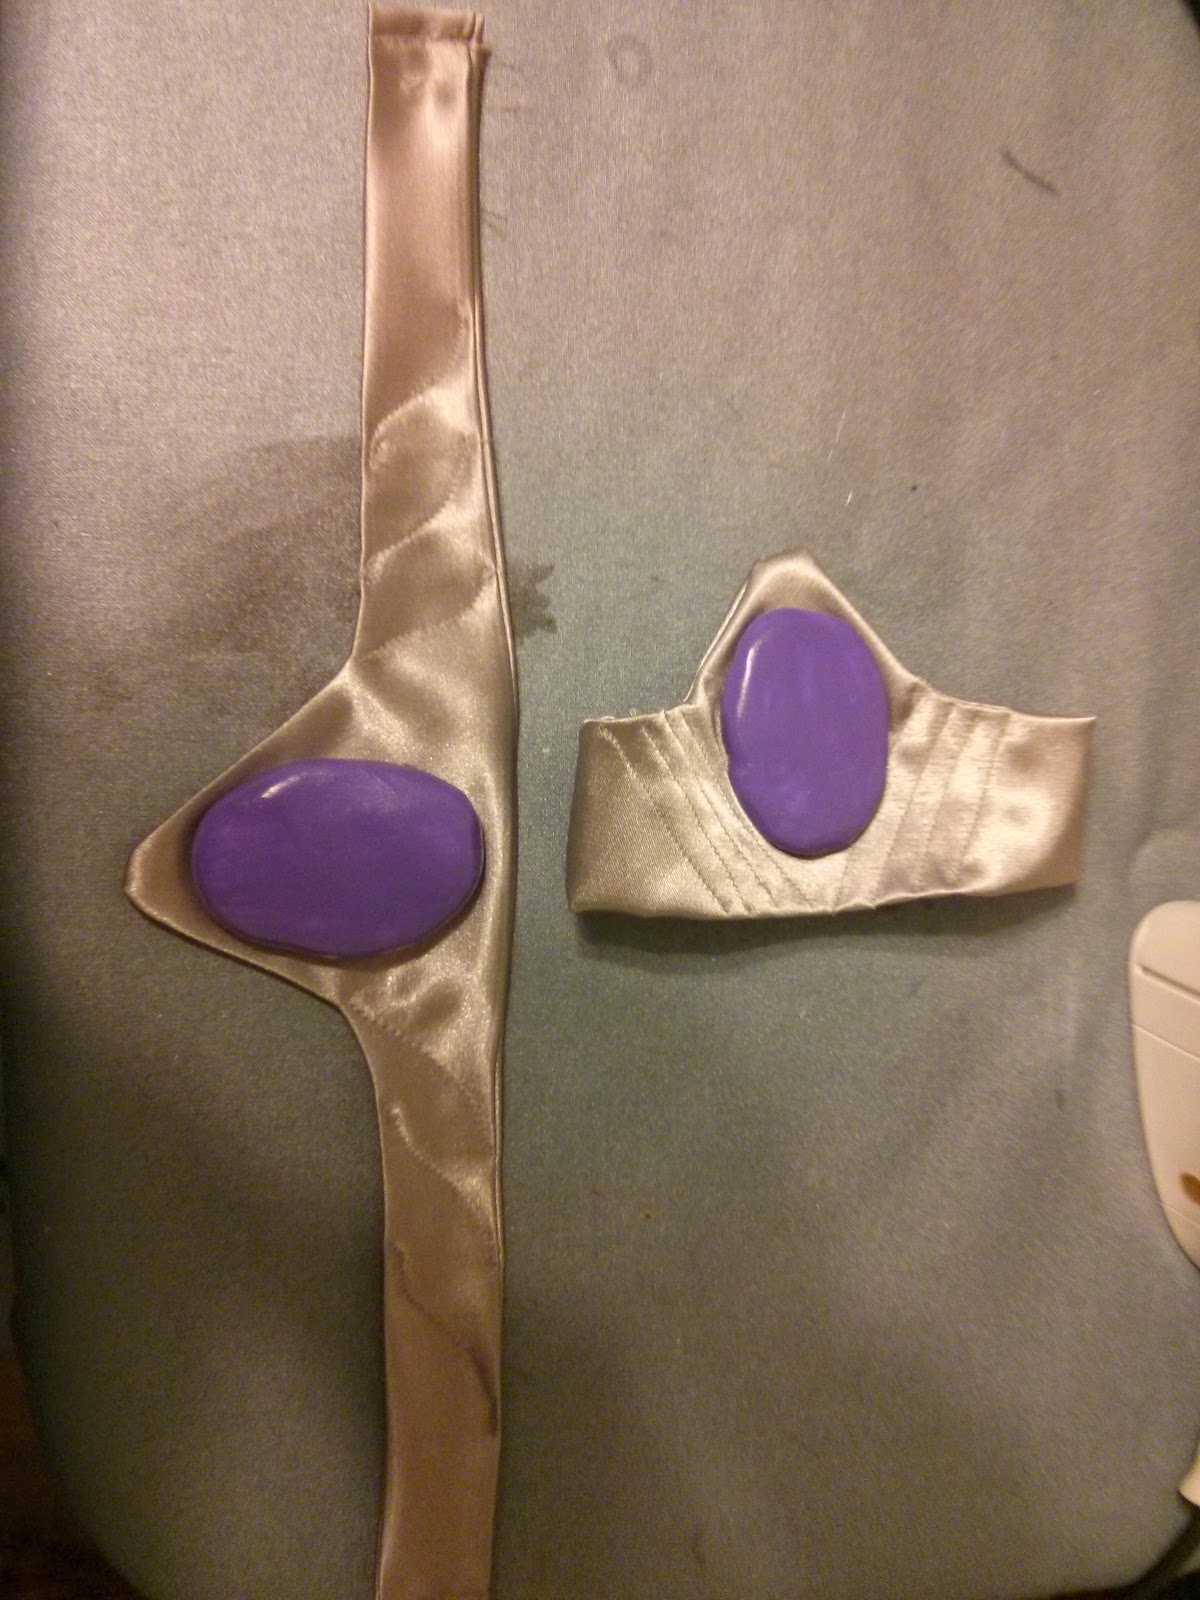
Anyway, with the dress finished I started working on the jewelry. Queen Beryl wears a headpiece and earrings with aqua jewels, and a necklace and armband, each of which purple jewels. As I don't really know how to make nice jewels, and I didn't want to spend a lot of money, I opted to make them out of some spare ultra-light sculpey clay that I had laying around from a previous project. I formed the shapes by hand, baked them, sanded them lightly, then painted them and covered them with a clear glaze.


I shaped the wires into the approximate shape that I wanted to hold the ball and trimmed them to the right size. Next I took a sheet or two of paper and rolled it up into long crumpled tubes. I used these tubes to wrap around the top of the dowel to fill out a bit of the basic shape. Next I started applying papier-mâché around the top of the dowel where the paper tubes were, as well as along the base of the wires.

As I applied each layer I smoothed it with my hands and eventually it started taking on the shape I wanted. The very tops of the wires I put only 1-2 layer of papier-mâché and formed them into nice claw-like tips. I painted the whole thing an ivory colour, coated it with some mod podge for good measure, and also a clear glaze. Finally I glued the ball into place, sitting just barely inside the claws. It looks like it's just floating there, and I had people ask me how it was held in place.


So that's it! All together the staff contained about $5-6 worth of materials, the dress about $30-$40, and the jewelry next to nothing, as it was made from scraps and bits I already had around. Here's some final pictures from DragonCon. Pardon the crazy eyes in the first photo...I was a bit nervous at somebody else taking my picture :)


In my early teenage years I became pretty obsessed with Sailor Moon. And by pretty obsessed, I mean scarily manic obsessed. I owned every toy I could get my hands on. I ordered VHS tapes of the subtitled episodes that weren't available in North America. I had multiple geocities websites dedicated to the show (yes, they are both archived in the wayback machine, no I will not tell you their addresses.) With the show being rebooted I thought it would be a great opportunity to do a Sailor Moon cosplay, and I decided on the show's most iconic villain:
Queen Beryl
If there's two things that anime consistently gets wrong, it's physics, and the proportions of the human body. I decided not to attempt Queen Beryl's physics defying bustline and go with something a little more modest and in need of a lot less dress tape. I was a bit nervous going into this build though as the dress was very fitted. My previous costumes had a lot of room for error, but not this one. Additionally, having never worked with lining or boning before, I didn't really know what to expect.
I started with a pattern, not really knowing where else to start.
This McCall's pattern had the basic shape that I wanted for the bottom of the dress, involving both a fitted short skirt, and a much fuller lower skirt. The top though wasn't going to make the cut, so using the general shape as a guide for the pieces I went about drafting my own pattern. Here are the two pieces I ended up with for the front, and I used pieces similar to those in the pattern for the rest of the top.
You can get rolls of tracing paper from various sources, and it's pretty cheap. I would highly recommend it for anybody who will be either drafting their own designs, or modifying store bought patterns. As you can see from this one I made multiple revisions to this one. Expect to do the same if you're doing something completely new.
With my drafted pattern I went about making a prototype from scraps. This is a step that I often skip, because I'm lazy. I'm really glad I didn't this time though because, as you can see from the following photo, I definitely messed up my seam allowances in my pattern, making the half moons like crooked. Again, if you're doing something completely new, take the time to make a prototype before wasting nice fabric.
I'm not going to go into detail of making the dress, as I basically followed the instructions from the pattern. I used an eggplant satin and (near) matching lining. I sewed the bodice and bodice lining, then attached the boning to the inside of the bodice lining, then attached the lining to the outer fabric. I sewed the upper skirt and upper skirt lining, and attached them, then I attached the bodice to the upper skirt (leaving room for the zipper of course.) I attached an invisible zipper, which was a little tricky without a zipper foot for my sewing machine, but not impossible. Once I tried on everything and made a few alterations I slip stitched the linings to the seam allowances. Finally I made the lower skirt, without a lining, and attached it to the upper skirt. I let the dress sit for a few days before trying it on and making the final hem.
Because I opted not to make the plunge neckline, I decided not to use different fabric for the half-moons, as I was worried about how the dress might pull and wasn't sure if it would deform them. It turned out I probably could have used different fabric. I painted the inner halves of the half-moons with black fabric pain directly onto my dress. Then I made the outer halves (which I'll be honest, I forgot about when making the original pattern) out of some scraps and sewed them into the lining. It looks a little odd in this photo, but actually turned out to look quite nice I think.
Anyway, with the dress finished I started working on the jewelry. Queen Beryl wears a headpiece and earrings with aqua jewels, and a necklace and armband, each of which purple jewels. As I don't really know how to make nice jewels, and I didn't want to spend a lot of money, I opted to make them out of some spare ultra-light sculpey clay that I had laying around from a previous project. I formed the shapes by hand, baked them, sanded them lightly, then painted them and covered them with a clear glaze.
I used floral arrangement wire, which is very flexible, to enclose the aqua gems, and glued the two for the earrings to some basic study. For the headpiece, necklace, and armband I made them out of scraps of fabric. To give the headpiece some added structure I enclosed a piece of plastic stitch grid inside (as per the ears from my Gadget post). I also included a thin headband that would slide under the wig to hold on the headpiece. No, they don't look quite as nice as if I'd made them out of plastics and resins, but I was happy with what I was able to make last minute, as I had taken on this project just a few weeks before DragonCon.
Last project was the staff. This turned out to be much simpler than anticipated. I started with a basic $3 dowel from Home Depot. I drilled 8 small holes into the top of the dowel and inserted small sections of stiff wire (I'm going to say it was 12 gauge? Not sure.) along with some glue to hold them in place. I found a purple bouncey ball for $1 at Dollar Tree, but decided to spray paint it anyway to give it a richer colour, and also cover up the UPC code.
I shaped the wires into the approximate shape that I wanted to hold the ball and trimmed them to the right size. Next I took a sheet or two of paper and rolled it up into long crumpled tubes. I used these tubes to wrap around the top of the dowel to fill out a bit of the basic shape. Next I started applying papier-mâché around the top of the dowel where the paper tubes were, as well as along the base of the wires.
As I applied each layer I smoothed it with my hands and eventually it started taking on the shape I wanted. The very tops of the wires I put only 1-2 layer of papier-mâché and formed them into nice claw-like tips. I painted the whole thing an ivory colour, coated it with some mod podge for good measure, and also a clear glaze. Finally I glued the ball into place, sitting just barely inside the claws. It looks like it's just floating there, and I had people ask me how it was held in place.
So that's it! All together the staff contained about $5-6 worth of materials, the dress about $30-$40, and the jewelry next to nothing, as it was made from scraps and bits I already had around. Here's some final pictures from DragonCon. Pardon the crazy eyes in the first photo...I was a bit nervous at somebody else taking my picture :)
Subscribe to:
Comments (Atom)